
Tool versions: O!kurra Capital Defense EA 2.05 · OkurraButton · OkurraGlobal
Table of Contents
2.1 Why two modes, not one 2.2 Design mode — the indicators 2.3 Execution mode — the EA 2.4 The bridge: the .set file 2.5 Cross-sync: OkurraButton ↔ OkurraGlobal on one chart 2.6 Design state: applied, draft, per-chart isolation 2.7 Why there is NO live connection 2.8 The full workflow step by step
2.1 Why two modes, not one
Most Expert Advisors on MetaTrader do two things in one file: they let you enter parameters and immediately trade with them. You type them in, click OK, the robot starts. Simple — but it has one serious flaw: you design blind. In the Inputs window you see a list of several hundred numbers and switches, and what they mean on the chart — where the MMD filter will land, how densely the OKUR oscillator signals at that threshold, whether the SR zones are even where you think they are — you will only see once the robot starts working and opens (or does not open) its first positions.
O!kurra separates these two activities into two distinct working modes, served by separate tools:
Design mode — working with the OkurraButton and OkurraGlobal indicators (plus the companion indicators). Here you lay out the strategy: on a live chart, with immediate visual feedback, without a running robot and without any risk. You change the threshold — and immediately see where it now lands. You enable the MMD filter — and see its clouds on the chart. Nothing trades. You save the result of the work to a .set file.
Execution mode — working with Okurra EA. Here you execute the designed strategy: you load the finished .set file into the robot, and it opens, watches over and closes positions according to what you designed. While it works, you steer it tactically from the panel (enable/disable buttons, place a zone, arm BEa, change the daily limit), but the strategic shape of the configuration comes from the design phase.
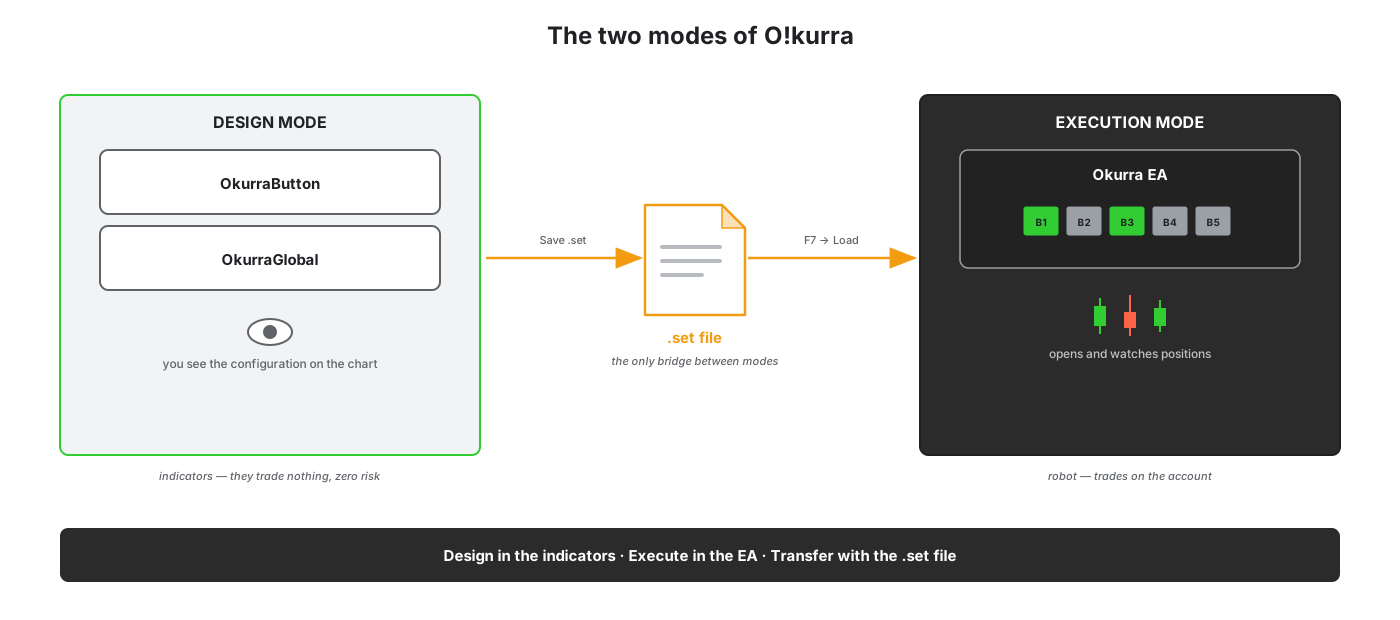
The benefit of this split is twofold. First — you design while seeing. Before the robot starts, you have on the chart the full picture of what it will be working on. Second — you design safely. The indicator trades nothing, so you can iterate the configuration at will, on a live market, without placing a single position. Only when the design suits you do you transfer it to the EA.
There is also a third, subtler benefit: the configuration becomes a durable, portable artifact. The .set file is not a fleeting state in the robot’s memory — it is a document you can name, archive, compare with a previous version, load on another account or send. More on this in section 2.4 and throughout chapter 7.
Positioning of the tool. Design mode is a laboratory — the place where a strategy hypothesis becomes observable before it touches the account. Execution mode is the observation of the consequences of that hypothesis on a demo account. The decision to transfer a configuration to a live account remains on your side and is made at your full responsibility.
2.2 Design mode — the indicators
In design mode you work with two designer panels, dropped onto the chart just like any other MT5 indicator (by dragging from the Navigator window).
OkurraButton — the designer of the five strategies. It is a panel in which you lay out the parameters of each of the buttons B1…B5 individually: direction, the OKUR engine (Period, Sensitivity, Timeframe, Threshold), triggers, signal validity band, pending orders, position limits, lot, SL/TP, Break Even, Trailing Stop, local filters and the Activation & Exits section. You edit each parameter directly on the panel, without entering the Inputs window. Full description — chapter 4.
OkurraGlobal — the designer of the settings shared by the whole EA: the global filters (SAR, MMD, SR, OKUR Filter), the account guardian mechanisms (Daily P/L Limits, Equity Guard, Profit Target), Break Even Auto with its triggers, Stop on Opposite, Trading Hours and the settings of the panel itself. Full description — chapter 5.
Companion indicators — nine visualization indicators that read the configuration designed in the panels and draw on the chart what a given filter or oscillator sees: OkurraSAR, OkurraMMD, OkurraSR, OkurraOscillator (per-button), their global counterparts and OkurraGlobalATR — the volatility-gate window (global version only, since release 2.03). OkurraGlobal can load its global versions onto the chart and remove them when the panel is taken off the chart — but since panel 2.08 the five “Auto-load …” switches (panel settings, F7) are off by factory default, so a freshly dropped panel adds nothing on its own: you turn an overlay on in F7, or drag it in from the Navigator. Thanks to this you design while seeing — the SAR dots, the MMD clouds, the SR zones and the OKUR trace appear exactly where the robot will be looking. Full description — chapter 6.
Crucially: none of these indicators trades anything. They do not open positions, they do not place orders, they do not touch the account. They are drawing-and-design tools — you can keep them on the chart all the time and nothing will happen beyond you seeing your configuration on the price. In line with the positioning of the whole set as a research and education tool, you work with O!kurra on a demo account — for analysis and learning.
2.3 Execution mode — the EA
In execution mode you work with Okurra EA (full name: O!kurra Capital Defense) — the only element of the ecosystem that actually trades. It is the one that opens positions, places pending orders, moves SLs, closes baskets, watches the account limits.
The EA is self-contained. It does not require the presence of any indicator on the chart to operate — it carries its entire configuration within itself (in its own Inputs), and it draws its control panel on its own. You can launch the EA on a clean chart, without a single Okurra indicator, and it will work fully.
Where does the EA get its configuration? From two sources, in this order:
- From its own Inputs parameters — entered manually in the EA’s configuration window or (much more conveniently) loaded from a
.setfile with the Load button in that window (the F7 key on the chart with the EA). This is the primary route by which a designed strategy reaches the robot. - From the panel, while it works — tactical adjustments you make live: enabling/disabling buttons, placing zones and Target Lines, arming BEa, changing the Daily Profit / Loss / EG / PT limits. These are not “strategic” changes — they are the ongoing steering of what has already been designed.
The boundary between these two is deliberate and returns throughout the manual: strategic things enter the EA through .set (from the design phase); tactical things you adjust live from the panel. Most Inputs parameters are loaded once, at EA start, and do not change while it runs — to change them, you stop the EA, load a new .set or edit the Inputs, and launch it again. The exceptions (limits editable live from the panel) are clearly indicated in the relevant chapters.
The EA can be configured “the old way”, fully on its own. Because the robot carries its entire configuration in its own Inputs, you can skip the indicators and set everything manually straight in the EA’s configuration window — this is a fully supported route. In practice, however, it can be tedious: there are very many parameters (the global settings plus five buttons), you edit them in a long Inputs list, with no preview on the chart and no visual control. That is why the recommended route is designing in the indicators and exporting through the
.setfile — faster, clearer and with an immediate preview of what you are designing. Manual configuration remains as an option for those who need it.
2.4 The bridge: the .set file
The only link between design mode and execution mode is the .set file — the standard MetaTrader 5 settings file format. It is a plain text file in which each line has the form ParameterName=Value. The EA can load it natively (the Load button in the Inputs window), and the Okurra indicators can save it in a format the EA understands.
In the O!kurra ecosystem there are two kinds of .set files, saved from two different panels:
.set from OkurraGlobal — the full setup. When you click Save .set in the OkurraGlobal panel, a complete set is saved: the global section (the EA’s shared settings, 373 fields) and the parameters of all five buttons (B1…B5, 96 fields each — 480 fields in total). Such a file is a ready, complete configuration of the whole EA — 853 keys in total (counts from a file saved by the panel in release 2.03; the license key and the diagnostic-journal retention setting are deliberately not written); you load it into the robot in one move and you have everything: the globals and all the strategies. Default name: Global_<timestamp>.set.
.set from OkurraButton — buttons only. When you click Save .set in the OkurraButton panel, only the parameters of buttons B1…B5 are saved, without the global section. Such a file is useful when you want to transfer just the strategies, keeping the global settings you already have. Default name: Button_<timestamp>.set.
After saving you can rename the file to your own readable name (e.g. XAUUSD_mean-rev_M1.set) directly in the Load dialog in the panel — which turns an impersonal timestamp into a descriptive label of your configuration.
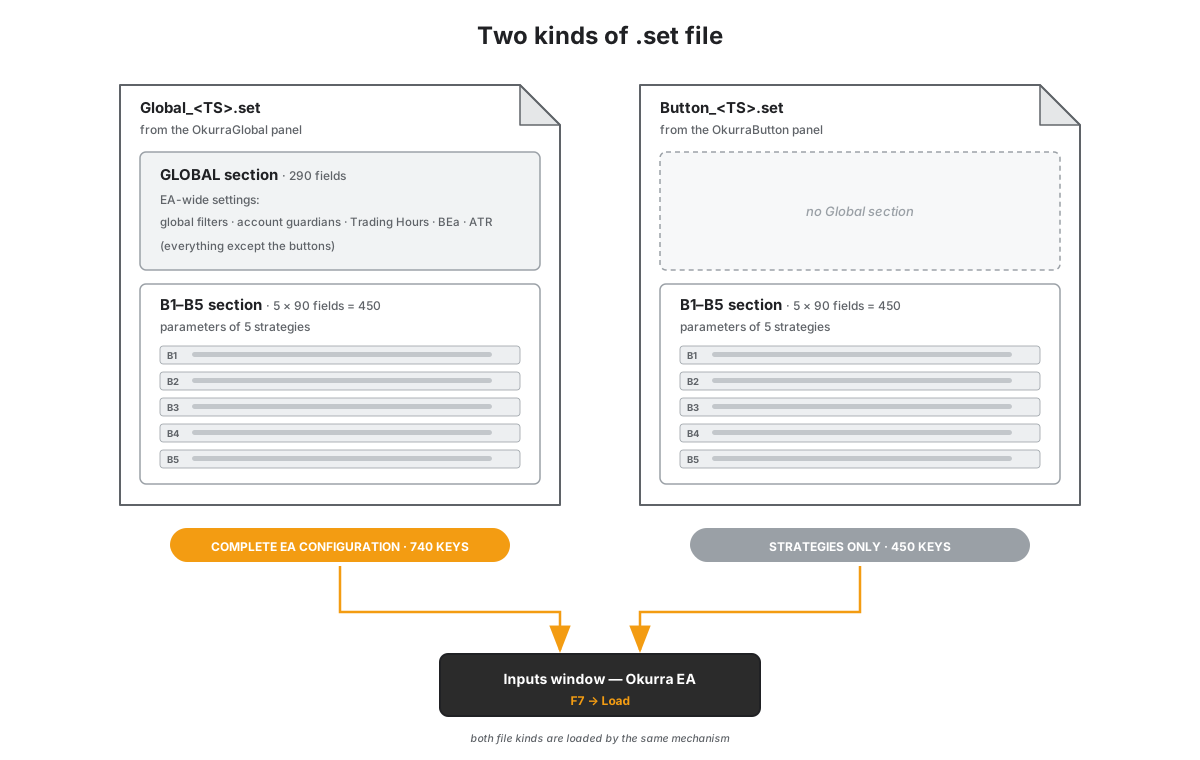
All .set files land in the MQL5/Files/OKU/sets/ directory inside the MetaTrader sandbox. From the EA’s perspective these are ordinary settings files — the robot neither knows nor cares that they were created in an Okurra indicator; it simply sees a valid .set that can be loaded through F7. A full description of saving, naming and transferring configurations — chapter 7.
2.5 Cross-sync: OkurraButton ↔ OkurraGlobal on one chart
There is one — and only one — case in which the Okurra tools communicate with each other “live”: synchronization between the two designer panels on the same chart. This is not a connection to the EA (there is none — section 2.7), just a convenient mechanism between the indicators themselves in the design phase.
It works like this: when you have both panels on the chart — OkurraButton and OkurraGlobal — and you load a .set file in one of them (Load .set), that panel, after loading, sends the other a short notification: “I loaded this file, do the same on your side”. The other panel re-reads the same .set file and loads its own part:
- You load a
.setin OkurraGlobal → Global loads the global section, and OkurraButton (if present on the chart) loads the B1…B5 parameters from the same file. - You load a
.setin OkurraButton → Button loads B1…B5, and OkurraGlobal (if present on the chart) loads the global section from the same file.
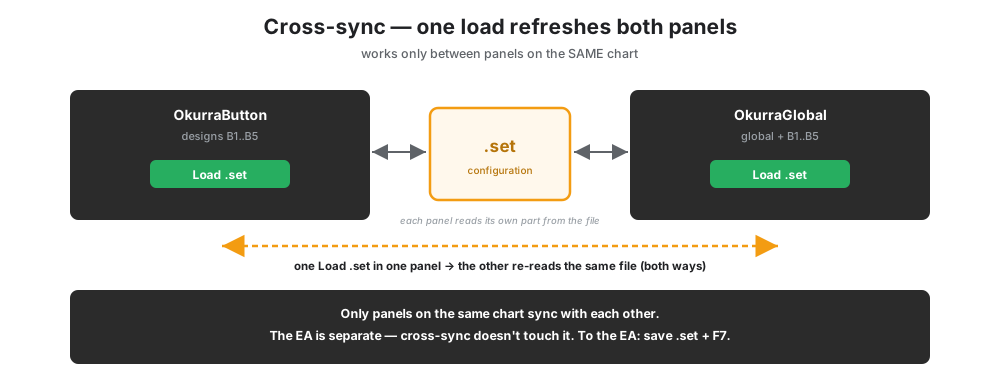
Thanks to this, one file load is enough — it refreshes both panels at once; you do not have to load the same configuration twice (separately into OkurraButton and separately into OkurraGlobal). The mechanism is local to the chart: only panels on the same chart synchronize. This is deliberate and consistent with the per-chart isolation described in the next section — two charts of the same instrument have separate design states and do not mix with each other.
Cross-sync does not touch the EA. Loading a .set in one panel synchronizes only the other panel — never a running robot (besides, the EA and the panels work on separate charts, section 2.7). For a change to reach the EA, you must save a .set and load it in the EA through F7.
2.6 Design state: applied, draft, per-chart isolation
Design work in the panels must survive somewhere between chart refreshes, timeframe changes or recompilation. The panels save their state to .ini files in the MQL5/Files/OKU/applied/ directory. From the user’s perspective this directory is invisible — you do not go into it manually — but it is worth understanding what happens there, because it explains several panel behaviors.
Two kinds of state per button (and for Global):
applied— the applied state, i.e. what the panel last “committed”. The fileB<N>_applied.inifor each button andGlobal_applied.inifor the global settings. This is the reference point from which the companion indicators read (in order to draw the correct filters).draft— edits in progress, i.e. changes you have entered but not yet committed (B<N>_draft.ini,Global_draft.ini). They let you edit the configuration in batches without losing it before you click Apply.
History (history/). On every commit (Apply), every .set load and every sync from the Global panel OkurraButton appends a copy to MQL5/Files/OKU/history/ (auto_B<N>_<timestamp>.ini); OkurraGlobal writes no history copy (up to release 2.04 it wrote auto_Global_<timestamp>.ini). From 2.05 the panel cleans up by itself: the 10 newest auto-copies per button stay, older ones are deleted at every next automatic write; named saves (manual_*.ini) and .set files stay without a limit. Thanks to this you can go back to an earlier state of the design, even if you did not save it as a .set — but only within the last ten commits.
Per-chart isolation. This is an important detail if you work on several charts of the same instrument. Each chart has its own, separate design state — the applied/draft files are tagged with a unique chart identifier (ChartID), stable across timeframe changes and recompilation. Without this isolation, two XAUUSD charts would share the same state and the companion indicators on chart 2 would follow the button designed on chart 1. With the isolation — each chart is a separate design workshop.
Companion indicator visualization (applied/viz/). When the companion indicators are to display a specific configuration, they read it from a dedicated space applied/viz/, separated from the main design state. This matters especially in execution mode: the EA itself can publish there the configuration of the active strategy and control the companion indicators (showing on the chart the filters of the button you are currently observing) — without mixing with what you are designing in the panels. The details of this cooperation — chapters 6 and 18.
Practical note. These
.inifiles are the internal state of the tools and are not the same as.set. The.iniinapplied//draft//history/is the panels’ working memory; the.setinsets/is the portable, F7-loadable configuration artifact for the EA. Only the.setreaches the robot — the.inifiles are never read by the EA.
2.7 Why there is NO live connection
The separation of design from execution is a deliberate design decision, worked out from experience. Configuration flows in one direction and only on your explicit command: panel → .set → F7 → EA. There is no automatic “pushing” of changes from the panel into a running robot; the only live communication is the cross-sync between the panels themselves (section 2.5).
From this assumption also follows an important practical rule: the design panels and the EA work on separate charts (section 2.8). If they ended up on one, two tools would draw their own panels and objects on the same space, and the design visualization would mix with the robot’s visualization. That is why, when OkurraButton or OkurraGlobal detects an EA on its chart, the panel suspends itself — it hides its content and the companion indicators it pulled in, and in their place shows a banner asking you to remove the indicator from this chart (“design charts only, no EA”). After the EA is removed, the panel resumes work automatically. It is a simple barrier guarding the clean division: design on one chart, execute on another.
The reasons the flow is one-way and manual:
- A robot that is trading should not change the rules mid-game by accident. If every edit you made in the panel instantly redesigned a running EA, one careless click during design could change the behavior of a robot that is currently managing open positions. The separation ensures that a change reaches the robot only when you consciously load a
.set— it is an act, not an accident. - Design and execution have different tempos. You iterate a design freely, changing dozens of parameters, watching the effects, backtracking. Execution is meant to be stable — the robot executes one, committed configuration until you consciously swap it for another. The
.setfile is the natural “freeze frame” between these two rhythms. - Configuration as a document. When the only bridge is the
.set, every configuration you launch has its own file — named, archived, comparable. There is no “fleeting state” that existed only in memory and vanished. It is a discipline that pays off when researching many strategy variants.
The consequence for your workflow is simple and worth memorizing once and for all: an edit in the panel never changes a running EA. For a change to reach the robot, you save a .set and load it in the EA through F7. If you ever catch yourself thinking “I changed a parameter in the panel, why is the robot still doing it the old way” — that is not a bug, that is precisely this architecture. A step is missing: save .set + F7 (on the chart with the EA).
Claude (the chatbot at okurra.com) and this manual will keep reminding you of this, because it is the most common misunderstanding among new users. You design in the indicators, you execute in the EA, you transfer with the .set file — and that transfer is always a conscious move.
2.8 The full workflow step by step
Putting it all together — here is the complete road from idea to a working robot, with a note of which mode you are in at each stage.
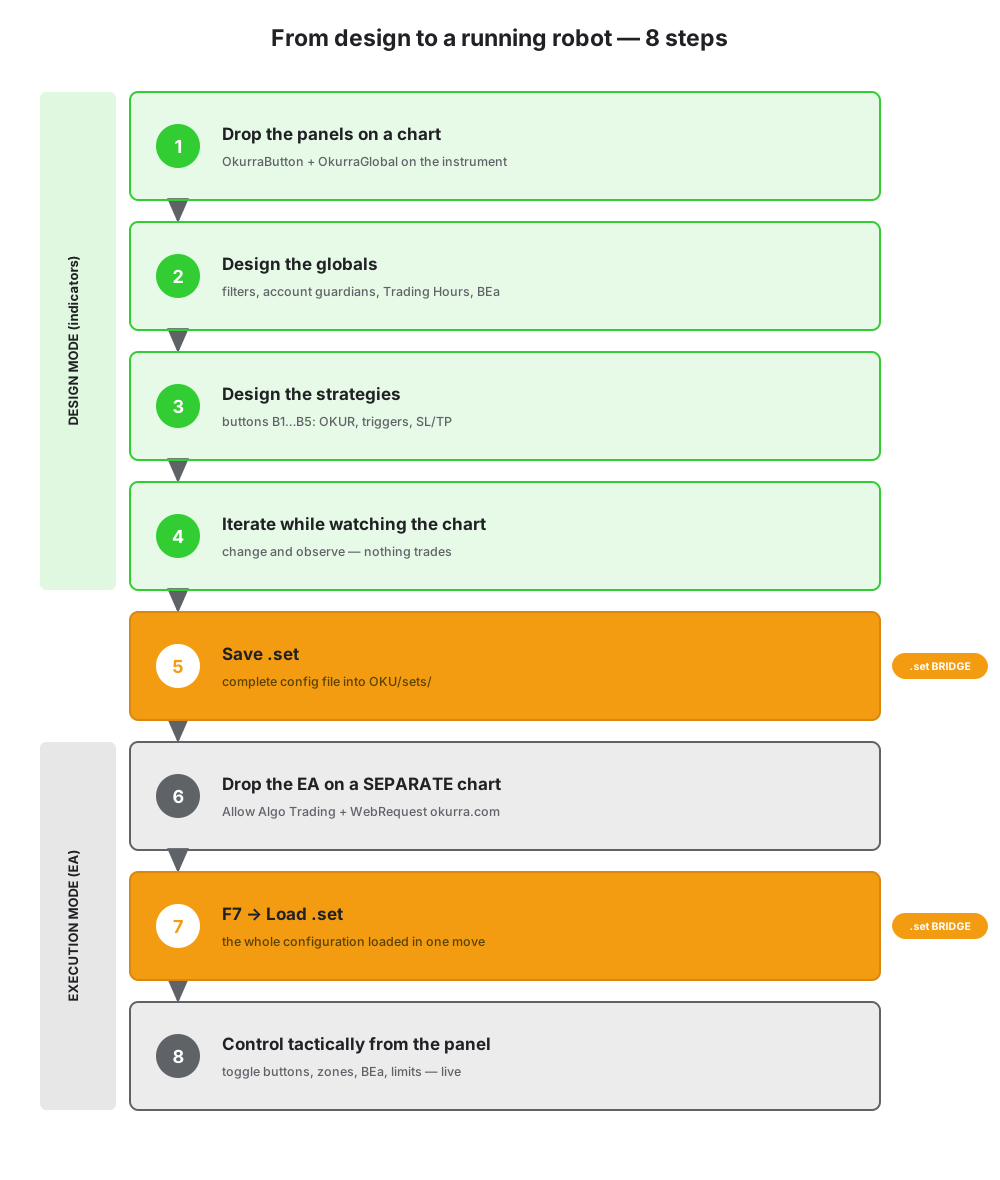
Design phase (indicators):
-
Drop the panels onto a chart. Onto the chart of the target instrument (e.g. XAUUSD M1) drag OkurraButton and OkurraGlobal. If you enable the “Auto-load …” entries in OkurraGlobal’s settings (F7) — they are off by factory default — its companion indicators will appear automatically.
-
Design the globals (OkurraGlobal). Set the global filters, the account guardians, Trading Hours, BEa — what is shared by the whole EA. Watch on the chart how the global filters (SAR, MMD, SR, OKUR) lay out on the price.
-
Design the strategies (OkurraButton). Configure buttons B1…B5 — direction, the OKUR engine, triggers, local filters, SL/TP. Watch on the chart the oscillator and the filters of each strategy.
-
Iterate. Change parameters, look at the effect on the chart, refine. Nothing trades — you have full freedom. This is the real design work: as long as the picture on the chart does not suit you, you stay in this phase.
The transition between modes — the .set bridge:
- Save the
.set. When the configuration suits you, in the OkurraGlobal panel click Save .set — a complete file (Global + B1…B5) is created inOKU/sets/. (Or Save .set in OkurraButton, if you want just the strategies alone.) You can rename it right away to a readable name.
Execution phase (EA):
-
Drop the EA onto a separate chart (not the one where you have the design panels — section 2.7). In the EA’s configuration window, on the Common tab, check Allow Algo Trading. Additionally, for license verification, in Tools → Options → Expert Advisors add
https://okurra.comto the Allow WebRequest for listed URL list (this is sufficient for license key verification — details in chapter 3). -
Load the
.set(F7 → Load). In the EA’s configuration window, on the Inputs tab, click Load and point to the saved.setfile. The entire designed configuration loads into the robot in one move. Click OK. -
Steer tactically from the panel. The EA starts with the loaded configuration. From this moment on you enable/disable buttons, place zones and Target Lines, arm BEa and adjust the limits — all from the EA panel, live. You observe how the robot executes your design on the demo account.
A note on separate charts. The design panels and the EA must be on separate charts — this is not a preference but a requirement following from the architecture (section 2.7). If you drop OkurraButton or OkurraGlobal onto a chart where the EA is running, the panel will detect the robot and suspend itself, showing a banner asking you to remove the indicator (“design charts only, no EA”). The typical layout is: one chart of the instrument with the design panels (design phase), a second chart of the same instrument with the running EA (execution phase). The bridge between them is the .set file.
Iterating the configuration during tests. When, after observing on demo, you want to change the strategy: you go back to the panels (design phase), refine, save a new .set, and load it in the EA (F7). The old .set stays in sets/ as an archive — you can return to it and compare. This is the natural work cycle with O!kurra: design → save → execute → observe → return to designing. Patience and order in your .set files are the main tool here.
In the next chapter we move on to the installation of the whole package — the EA and the indicators — as well as the first launch and license key verification at okurra.com.