
Tool version: OkurraGlobal — release 2.05
A note on chapter scope. This chapter describes how to operate the OkurraGlobal panel — its layout, sections, Apply, saving configurations. The meaning of the individual global settings is covered in the topic chapters: global filters (10), Break Even Auto (12), Stop on Opposite (13), Daily P/L Limits (14), Equity Guard and Profit Target (15), Trading Hours (16). Here you learn the tool; there — the mechanisms.
Table of contents
5.1 What OkurraGlobal is 5.2 Relationship with OkurraButton — sister panels 5.3 Panel anatomy 5.4 Two layouts: vertical and horizontal (tab bar) 5.5 Section families — what you set where 5.6 Apply (N) — the change counter and committing 5.7 Save / Load .set — the full setup of the entire EA 5.8 Global companion indicators 5.9 Cross-sync with OkurraButton 5.10 The typical design cycle for global settings
5.1 What OkurraGlobal is
This chapter describes the OkurraGlobal panel at version 2.29 — the version shipped in release 2.05. The panels carry their own numbers, independent of the release number (chapter 23, “How do I know I have the latest version?”).
OkurraGlobal is the second design panel of design mode — the sister of OkurraButton. Where OkurraButton deals with the five strategies (B1…B5), OkurraGlobal deals with everything that is shared by the entire EA: global filters, account guardians, the Break Even Auto mechanism, Stop on Opposite, Trading Hours, chart objects and the settings of the control panel itself.
The split is simple:
- OkurraButton = what each of the five strategies does (chapter 4).
- OkurraGlobal = the frame within which all the strategies operate — filters shared between buttons, limits protecting the account, working hours, basket mechanisms.
Just like OkurraButton, OkurraGlobal is a design tool — you lay out settings in it, watch the effect (e.g. global filters on the chart through the companion indicators), and save to a .set. It trades nothing. And just like OkurraButton, it is a free tool (chapter 3.2) — it works right after installation, with no key and no activation.
There is one important practical difference, which we return to in section 5.7: it is from OkurraGlobal that you save the full .set — the complete configuration of the entire EA (the global settings plus all five buttons). OkurraButton saves only the buttons; OkurraGlobal saves everything. That is why, in practice, OkurraGlobal is more often “the panel you export the finished setup from”.
5.2 Relationship with OkurraButton — sister panels
OkurraButton and OkurraGlobal are designed to work together on one design chart (without the EA — chapter 2). By default OkurraGlobal appears to the right of OkurraButton (with an offset set so that the panels do not overlap), so after dropping both onto the chart you have the strategy designer on the left and the global settings designer on the right.
They cooperate in two ways:
- A shared
.setfile. Both panels read and save the same configuration. When you load a.setin one, the other can refresh its own part (cross-sync — section 5.9). - Global vs local companion indicators. OkurraButton pulls in the companion indicators that show the filters of the active button; OkurraGlobal pulls in the ones that show the global filters (section 5.8). They can coexist on the chart — you see the global and the local context at the same time.
Like OkurraButton, OkurraGlobal has no business on a chart with a running EA — we keep designing separate from execution.
5.3 Panel anatomy
The OkurraGlobal panel, from the top:
- Title bar — tool name, on the left the collapse button for the whole panel (
[-]/[+]), on the right a smallH/Vbutton that switches the layout (section 5.4); the title bar is also the drag handle. Since 2.05 the collapse of the whole panel is remembered separately for each chart — it survives a timeframe change, a parameter change, a recompilation and a terminal restart. Removing the panel from the chart or closing the chart gives an expanded start. - Status bar — state messages (e.g. “Loaded: …”, “Applied locally (state saved to disk)”, errors).
- Top action row — the global buttons: R (Reset), Apply, Save, Load (sections 5.6–5.7).
- Settings sections — 37 sections grouped by topic (section 5.5), in one of two layouts (section 5.4).
The editing mechanics are the same as in OkurraButton (chapter 4.6), except for choice lists: in OkurraGlobal only timeframes open a menu, and every other choice field is switched by clicking. You change values in three ways, depending on the field type:
- Numbers and text — click the field, type the value, confirm with ENTER (ESC cancels).
- Choice fields (switches and modes) — each click jumps to the next value in a loop (the click commits immediately, no ENTER). This is how the on/off switches work, among others, as well as the Equity Guard value mode (currency/percent), the Daily P/L action, the 3-state stop action, and also modes with more options.
- Timeframes — a click opens a menu, from which you pick the item.
Just as in OkurraButton, the draft → applied distinction applies: an edit goes into the working version, and only Apply commits it (section 5.6), while an uncommitted field glows gold. The panel also supports size scaling, corner and position selection, the Consolas font and dragging by the title bar — like its sister panel.
5.4 Two layouts: vertical and horizontal (tab bar)
OkurraGlobal has more sections than OkurraButton (37 versus 12), so it offers two ways to arrange them. A small H/V button on the right of the title bar switches between them; the button’s text names the layout you will switch to: H — horizontal, V — back to vertical. In the Global panel the horizontal layout is the default — a fresh panel starts with the tab bar (OkurraButton starts vertical, chapter 4.11).
Vertical layout (classic). Sections stacked one under another, each collapsible via a header with +/−. You scroll the panel and expand the ones you are working on. In this layout each section header also has an “A” button — a shortcut to the full Apply: it commits the entire panel, just like the main Apply button (section 5.6), not only that section. The “A” buttons can be switched off in the panel settings (F7, the field Per-section "A" quick-Apply buttons (vertical layout only)); by factory default they are on.
Horizontal layout (tab bar). At the top of the panel (below the action row) a horizontal bar of 37 narrow tabs appears — one per section. Each tab’s label is a short section code written letter by letter, vertically (e.g. DPL, EG, GSAR, GOKUR, TH). You click a tab and the panel shows only that one section at full width, with its title above its rows; the sections have no +/− or “A” buttons here. The panel is wider in this layout, because it holds the whole tab bar. This keeps the panel vertically compact — instead of a long list you have “index cards” switched with a single click. Convenient when you are designing one thing at a time (e.g. only Trading Hours) and do not want to scroll through everything.
The switch between layouts and the selected tab are remembered (per chart), so the panel returns to your arrangement after a timeframe change or a restart.
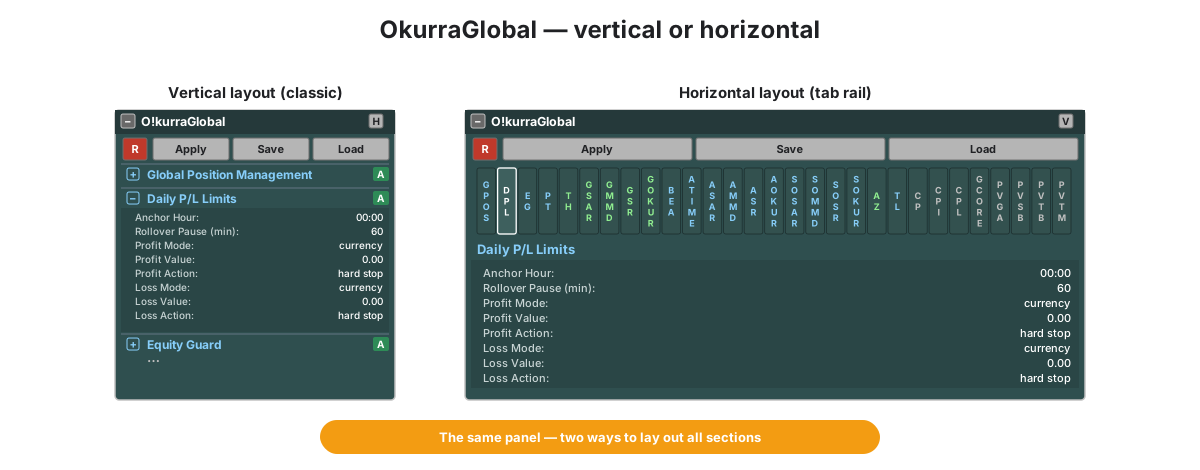
Which layout to choose? Vertical is good when you want to see several sections at once and scroll. Horizontal — when you have many sections and prefer to jump between them like tabs. It is a purely visual preference; it does not affect the settings being designed.
5.5 Section families — what you set where
Thirty-seven sections sound like a lot, but they fall into nine logical families. The order on the panel is deliberate: from the system settings (Global Core), through position and money management, filters and basket mechanisms, to the settings of the robot’s panel; the three sections of the Time Setups module come last.
| Family | Panel sections | Meaning → chapter |
|---|---|---|
| Position and account guardians | Global Position Management · Lot Volatility Scale (ATR) · Daily P/L Limits · Equity Guard · Profit Target · T. on Server | 9, 14, 15 |
| Trading session | Trading Hours | 16 |
| Global filters | Global SAR Filter · Global MMD Filter · Global SR Filter · Global OKUR Filter · Volatility Gate (ATR) | 10 |
| Break Even Auto | Break Even Auto (BEa) · BEa Auto-Arm: Time-of-day / SAR Flip / MMD Cross / SR Break / OKUR Cross | 12 |
| Stop on Opposite | StopOpp Setup · StopOpp SAR · StopOpp MMD · StopOpp SR · StopOpp OKUR | 13 |
| Chart objects | Activation Zones · Target Lines | 11 |
| Price movement sensors | Price Movement (shared settings + 4 sensor blocks) | 18 |
| Panel and system | Control Panel (+ Info, + Layout) · Global Core · Alerts · Panel: Global Actions / Status + Target Blocks / Trade Markers | 8, 20 |
| Time Setups | Time Setups · Time Setups: Minute Lists · Time Setups: Visuals | 19 |
The same in words: you set the position and the account guardians in the sections Global Position Management, Lot Volatility Scale (ATR), Daily P/L Limits, Equity Guard, Profit Target and T. on Server (chapters 9, 14 and 15), the working hours — in Trading Hours (16), the global filters — in Global SAR Filter, Global MMD Filter, Global SR Filter, Global OKUR Filter and Volatility Gate (ATR) (10), the BEa shield — in Break Even Auto (BEa) and the five BEa Auto-Arm sections (12), the reaction to an opposite signal — in StopOpp Setup and the four per-filter StopOpp sections (13), activation zones and target lines — in Activation Zones and Target Lines (11), the price movement sensors — in Price Movement (18), the robot’s panel and the system settings — in Control Panel (with Info and Layout), Global Core, Alerts and the three Panel: … sections (8, 20), and the minutes — in the three Time Setups sections (19).
A few practical notes on this breakdown:
- The global filters (5 sections) are the shared SAR/MMD/SR/OKUR sets that buttons “plug into” via the Use Global … Filter opt-in (chapter 4.5, meaning in 10). Here you set them once for the entire EA. The Global SR Filter section has — next to the SR Reaction Mode row — a “SR Last Zone Mode” row: a mode in which the last confirmed SR zone determines the only allowed entry direction (chapter 10.5). The fifth section, Volatility Gate (ATR), is the global volatility gate, which a button plugs into with the field
Use Global Volatility Gate (ATR)(chapter 10). - Break Even Auto is as many as six sections — BEa itself plus five separate Auto-Arm trigger sections (Time, SAR, MMD, SR, OKUR). This reflects the fact that each trigger has its own independent parameters (chapter 12). As of release 1.28 the BEa Auto-Arm: OKUR Cross section holds two triggers on a shared oscillator instance: the zone-based OKUR transition and the rows Bounce (arm on pull-back) / Bounce BUY Th / Bounce SELL Th / Bounce Correction — the sixth trigger, arming on a bounce off an exhaustion extreme (chapter 12.7). The “Break Even Auto (BEa)” section itself also holds the cells controlling the guard and the size of add-on positions: Zero-level guard (since Global 1.15 — the zero-level guard on its own switch, enabled by default), Adapted sizing, Multisize x / step / max lot (since release 2.00 the multiplier accepts fractions, and values below 1 give degression — chapter 12.6), Adapted 1st hedge % of basket (since Global 1.15 — the scale of the shield’s first add-on), Adapted tolerance unit (since Global 1.15 — the threshold’s unit: lots or % of the protected basket) and Adapted tolerance (0=flip, -=early) — the zero-level guard threshold (up to Global 1.14 the label “Adapted tolerance lots (0=flip)”); plus the 1st hedge open on arm row (formerly “Instant open on arm”) and Manual arm incl. all (enabled by default — a manual arm sweeps in the whole direction; chapter 12.3); since Global 1.23 also, at the end of the section, the Auto-Arm Mode SELL / BUY pair — the combination mode of that direction’s Auto-Arm triggers (any (OR) = the first one met arms, the default; all (AND) = a confluence of every enabled one; chapter 12.8); the meaning of all of them is described in chapter 12.6.
- Stop on Opposite is five sections — the shared StopOpp Setup plus one per filter (SAR/MMD/SR/OKUR), with parameters independent of the entry filters (chapter 13). The StopOpp Setup section (since Global 1.25) mirrors the F7 group “Stop Opposite Setup” and holds the Sources Mode (all buttons) row — the global combination mode of the button’s active SO filters (any (OR) = the first opposite one reacts, the default; all (AND) = the reaction only when all are opposite at once; chapter 13.9). The setting is shared by all sources and all buttons — which is why it lives in its own section rather than in any of the per-filter ones.
- Daily P/L Limits has, since 2.05, a Scope row (below Rollover Pause (min)): whether the daily limit counts only this robot’s result (this EA, the factory default — the positions with its Magic Number on this symbol: the result realized since the day reset plus the current one) or the change in equity of the whole account since the day reset (whole account). In the EA’s Inputs window this is the field
DPL scope: OFF = this EA only (default), ON = whole account equity; you set it in the Global panel or in F7. Meaning in chapter 14.1. - T. on Server — a separate section in the position/guardians family (under this label on the panel): the mode for writing real SL/TP on the broker’s server side (with a schedule), an alternative to the virtual (stealth) SL/TP watched by the EA. We cover the mechanism in chapter 9.
- The “Price movement sensors” family is a single Price Movement section (the family’s shared settings + four sensor blocks of six rows each) — physically it sits on the panel between StopOpp OKUR and Activation Zones; meaning in chapter 18.
- The “Panel and system” family does not concern strategy, only the look and visibility of the EA control panel — what to show, how to arrange it. Global Core contains system settings: the Magic Number plus the virtualization of pendings and SL/TP, and from release 2.04 also the Time spans counted in row — whether the setup lifetime, the pause after Equity Guard / Profit Target and the duration of a new zone count in market minutes (
market min, the default) or clock minutes (clock min); described in chapter 9, §9.16. (The license key is not shown by the panel — you enter it only in the EA inputs, chapter 3.) The meaning of these settings is covered with the EA panel (chapter 8). The Panel: … and Control Panel sections set the look of the robot’s panel. Since 2.05 the robot’s panel also has its own horizontal layout with a bar of five tabs (BTN,ACT,STAT,TRD,TSET), but you switch it with theH/Vbutton on the title bar of the robot’s panel itself — the Global panel has no row for it (chapter 8.2a). The Alerts section also belongs to this family — eleven cells for muting the EA’s alert popups (since 2.05 also Own Registry Popup, which until then lived only in the EA’s Inputs window; described below in this subsection). - The “Time Setups” family is the three sections of the minutes module (chapter 19): Time Setups (the rules of setups), Time Setups: Minute Lists (the minute lists and their sources) and Time Setups: Visuals (target switching and drawing). The rows added in 2.05 are described in the subsection “The Time Setups sections — new rows” below.
This chapter is about where these settings are and how to commit them. For the meaning of each of them, reach for the chapters in the right-hand column.
The same can be set in the EA itself. Each of these sections corresponds to a group of parameters in the EA’s Inputs window (e.g. Global Position Management, Daily P/L Limits, Equity Guard, T. on Server, Trading Hours…). So OkurraGlobal is not technically necessary — you can configure everything directly in the EA via F7. The panel, however, gives you a readable division into sections, a preview of the global filters on the chart and the gold marker of uncommitted changes, so designing in it is more convenient and less error-prone than in the raw, long Inputs list (chapter 8.1).
Position Management section cells — including price deviation (slippage)
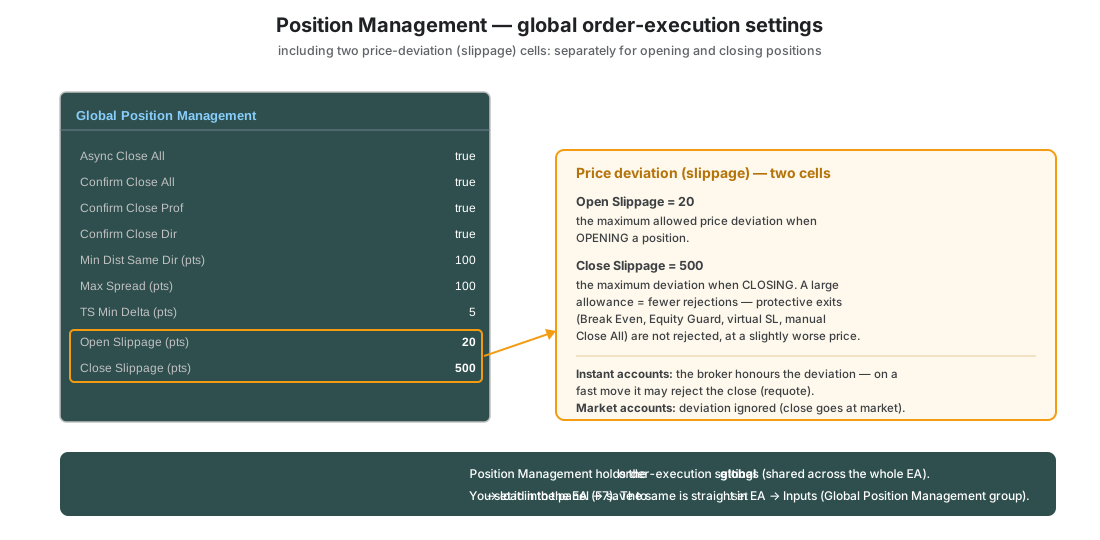
In the Position and account guardians family, the Position Management section gathers the global order execution settings. Next to the “Max Spread (pts)” cell (maximum allowed spread) and “TS Min Delta (pts)” there are two price deviation (slippage) cells:
- “Open Slippage (pts)” (default 20) — the maximum allowed price deviation when opening a position.
- “Close Slippage (pts)” (default 500) — the maximum deviation when closing. A larger value = fewer rejected closes (in practice a forced exit, at the cost of a slightly worse price).
Why such a large margin on closing: on accounts with Instant execution the broker honors the allowed deviation and, during a fast move, can reject a close or a modification (requote). A generous margin on closing means that protective exits (an emergency Break Even close, Equity Guard, virtual SL, manual Close All) do not get rejected. On Market accounts the deviation is ignored (the close goes at market anyway). The concepts of Market / Instant execution and slippage — chapter 3.
You set the values in the OkurraGlobal panel, and then — like any configuration — save them to a .set and load them into the EA via F7 (section 5.7). Since 2.05 (panel 2.23) both cells really can be edited and count in the Apply (N) counter — up to release 2.04 a click did not open an edit field. A negative value is turned into 0 by the panel.
Confirming Time Setups actions (from 2.05). Next to the Confirm Close All, Confirm Close Prof and Confirm Close Dir switches the section has a Confirm Time Setups row (factory default true; in the EA’s Inputs window the field Show confirmation before Time Setups [C] / [X] / [R]). It decides whether the [C], [X] and [R] buttons of the Time Setups section in the robot’s panel ask for confirmation before doing anything (chapter 19.13).
Volatility-based lot normalization (ATR) — the Lot Volatility Scale (ATR) section
Since release 2.00 the robot has volatility-based lot normalization (ATR) — a mechanism that scales the base lot of all buttons according to the market’s current volatility, by factory default inversely to it (high volatility = smaller lot, low = larger). In the Global panel you set it in its own section, Lot Volatility Scale (ATR), right below Global Position Management. The section has seven cells: the Scale lot by volatility switch, ATR period and ATR timeframe, Reference ATR (pts, 0 = off) (= 100% of the lot; 0 = the mechanism stays inert, even with the switch on), the bounds Min scale (%) and Max scale (%) (25–400% by default) and Scale direction (inverse — the factory default, inversely to volatility; proportional — the lot grows with volatility). The whole thing is disabled by default. The meaning and calibration are described in chapter 9.9; like every Global section, you export the values via .set (the LotATR_* keys) and load them into the EA through F7 — the same group in the EA’s Inputs window is called “Lot Volatility Normalization (ATR)”.
Monitor Own Only — the “own only” mode
The “Monitor Own Only” cell (enabled by default) switches the EA into “own only” mode: the robot manages (Break Even, Trailing, virtual SL/TP, baskets, all closes) only the positions it opened itself — not all positions with a matching Magic Number on the symbol.
What it is for: when two EA instances work on the same symbol with the same (or an overlapping) Magic Number — e.g. two charts of the same instrument with different settings — without this mode each would see the other’s positions as its own (“bleed-through”): it would count them into its basket, move their stops, and close someone else’s positions on Close All. In “own only” mode each instance keeps its own position registry (a persistent file in MQL5/Files/OKU/ea_memory/, identified by account, symbol, Magic and chart), which survives a terminal restart and a recompilation.
How does the EA know a position is “its own”? Since EA 1.11 the registry entry is created at the moment this instance sends the order — not based on a Magic Number read back from broker notifications. This is a deliberate hardening: broker notifications can be incomplete (a rejected asynchronous order can come back without a Magic), and with two instances sharing or overlapping a Magic, a notification-fed registry would credit each of them with the neighbor’s openings as well — punching holes in the isolation exactly where it was supposed to protect. Now a neighboring instance’s position will never end up in the registry; the only moment the EA adds positions “by Magic” is the one-time adoption on the mode’s first run (see below).
Three behaviors worth knowing about:
- Updating on a live basket is safe. On the first run of this mode (the registry does not exist yet) the EA automatically adopts the currently open positions with its own Magic — nothing falls out of its care. If the registry already existed and some positions nevertheless remained outside it (an emergency case), the EA settings include a one-time switch
Global_OwnOnly_AdoptExisting(disabled by default): enable it, restart the EA — it will add all current positions with its own Magic to the registry — and switch it back off. - Resilience to broker refusals. A position is removed from the registry only when it has actually disappeared from the account. A close rejected by the broker does not push it out of protection.
- The mode’s boundary: it isolates the management of open positions. The realized result of the day (Daily P/L) is still counted per Magic Number — two instances sharing a Magic still share “the daily zero”. That is why spacing the Magic bases apart (by ≥7) remains recommended (chapter 9); “own only” protects against mixing baskets, it does not exempt you from Magic hygiene.
Registry rows in the panel (from 2.05). Below the Monitor Own Only row there are four rows of registry settings that up to release 2.04 you could set only in the EA’s Inputs window (F7):
| Panel row | Factory default | What it does |
|---|---|---|
| Orphan positions | alert | what the robot does with an orphan position: off — nothing; alert — a journal entry and a popup, no change to trading; adopt proven — in addition takes positions with an ownership proof back |
| Record pending tickets | false | records in the registry the number of every pending order sent to the broker |
| Restart sweep: own list only | false | the post-restart pending sweep cancels only the orders recorded in the registry |
| Confirm ticket on deal | false | the robot confirms the position number registered at the send — and repairs it if needed — from the broker’s deal |
An orphan position is an open position with this instance’s Magic Number on this symbol that is missing from its registry — for example it was opened by a pending order at the broker while the robot was not running, it was opened in another environment (the built-in MetaTrader VPS does not carry the robot’s files over), or on a netting account it was registered under a wrong number. With Monitor Own Only on, the robot does not manage such a position: it has no Break Even, no trailing and no virtual SL/TP, the robot does not count it into baskets and does not close it with Close All. The Orphan positions row (in the EA’s Inputs window Orphan positions (own magic, missing from registry): Off / Alert / Adopt proven) says what to do with it, and it works only with Monitor Own Only on. With off the robot ignores it without a word. With alert (the factory default) the robot checks the account at start and then about once a minute, records each orphan once in the Experts journal and shows a popup, provided Own Registry Popup is on: an orphan with an ownership proof gets its own popup, the others — one summary popup per session; nothing changes in trading. With adopt proven the robot in addition takes back positions with an ownership proof — a pending order number recorded in the registry, or an Okurra_btn… trade comment when no other robot instance on this terminal has reserved the same Magic base on this symbol. An adopted position comes back under the robot’s full care; when ownership is unclear, the robot only warns.
The next two rows concern pending orders sent to the broker (Virtual Pendings = false). Record pending tickets (in F7 Record broker pending ORDER tickets in the own-registry - ticket-proof ownership for pendings that realize while the EA is offline) records the number of every such order in the registry; a position that comes from it while the robot is away then has the strongest ownership proof. Restart sweep: own list only (in F7 Restart pending sweep cancels ONLY pendings recorded in the own-registry (protects overlapping-magic siblings; needs TrackPendingOrders)) narrows the post-restart pending sweep: the robot then cancels only the orders recorded in the registry and leaves the orders of another instance with an overlapping Magic base alone. Without Record pending tickets new orders do not get into the registry — the robot writes a note about it at start. Turn both rows on when you work with orders at the broker and several instances with overlapping Magic bases run on one symbol. Turn Confirm ticket on deal (in F7 Netting/slow-fill accounts: confirm the registered ticket from the broker deal event (repairs a wrong fallback ticket)) on for a netting account or with a broker that confirms openings with a delay: when a send comes back without a deal, the robot registers the position under a provisional number and corrects it when the broker’s deal arrives.
The one-shot adoption stays in F7 only. The switch One-shot: on init, adopt current magic+symbol positions into own-registry (use once when enabling on an open book, then set back to false) deliberately has no row in the panel. It is meant for a single use, and the panel carries its value into every saved set — a set with the switch on would repeat the adoption at every start of the robot, including after every load of the file via F7. After the adoption switch it off in F7 and save the set again (chapter 7).
Disabling the cell restores the old behavior (everything by symbol+Magic). The related “Markers Own Only” cell in the Panel: Trade Markers section analogously narrows the visualization of trades (history arrows and position lines) to this instance — details in chapter 20.
Close Model — how the EA sends closes
Two cells control how closes are sent (Close All, Equity Guard, Profit Target, Basket Max Loss, BEa, virtual SL/TP):
- “Close Model (0=Auto 1=Sync 2=Async 3=Adapt)” (default 0 = Auto; up to EA 1.22 the default was 3 = Adaptive) — the mode of the first close attempt:
- 0 Auto — the classic behavior: honors the Async Close All switch,
- 1 Sync — always synchronous: each close waits for the broker’s confirmation before the next one goes out (slowest with a large basket, maximum predictability),
- 2 Async — always asynchronous: the whole basket is sent at once (fastest),
- 3 Adaptive — asynchronous, but with learning: if after an asynchronous send the broker leaves positions unclosed, the EA switches to synchronous mode for the duration of a cooldown, after which it by itself tentatively returns to asynchronous.
- “Adapt Sync Cooldown (min)” (default 30) — the length of that cooldown in minutes.
In prose, about the default combination (since EA 1.23): the Auto mode honors the Async Close All switch, and that switch is off by default — so without changing anything every close waits for the broker’s confirmation (maximum predictability). If you want faster closing of large baskets, enable Async Close All or switch the model to Async/Adaptive — the mechanics of the modes are unchanged.
The safety net always works. Regardless of the model, after every send the EA verifies that the positions really closed, finishes off any stragglers synchronously and raises an alert. The model only picks the first shot — the verification and the finish-off are non-removable. The exception: a closed market (since release 2.04). When the broker refuses because the market is closed (code 10018 — the daily break or the weekend), the virtual SL/TP, the settlement of a minute, Timed Exit, the reaction to an opposite signal and the clean-up after a mass exit send one attempt per break and wait for the session to open (chapters 9.10, 13.2 and 19.15). The popup
NOT closed by broker after ASYNC send. Retrying SYNC.now appears only for a refusal while the market is open. The basket guardians behave the same way: since release 2.04 Equity Guard in target mode (no trailing), Basket Max Loss and Profit Target in “close losers only” mode, and since 2.05 also Equity Guard with trailing, Profit Target in “close all” mode and the daily limit with a hard stop. During the “market closed” pause they send no close, and on the first tick after it they check their condition again and close only if it still holds (chapters 14.6 and 15.10). Since 2.05 a close refused during a break erases nothing: Basket Max Loss keeps the basket’s reference point, Equity Guard keeps its target or its trailing level, an armed BEa shield stays armed, and the daily limit switches the buttons off only after a successful close. The pending orders (at the broker and virtual) stay when a guardian’s close, Close All, Close BUY / Close SELL, a target line or the shield’s realization is refused — also when the break refuses the close only at the send (chapters 8.5, 11.7, 12.6); the reaction to an opposite signal and Timed Exit cancel their button’s pending orders as before, because by design they take the button off the market. The condition is checked again after the break, because the result counted during a break is largely spread, which disappears once the market opens. Up to release 2.04 a refused close erased the guardian’s decision (chapter 15.10). The break also affects the minutes: since 2.05 a Time Setups listed minute that falls in a trading break or in the pause after a “market closed” refusal creates no setup — the journal shows one line withSKIPPED: the trade session of <symbol> is shut at this minute(chapter 19.11a).
Before the EA sends anything, it also checks whether trading is enabled at all (the terminal’s AutoTrading + the algo permission for the EA). When it is not — instead of an avalanche of rejections you get one clear “PROTECTION OFFLINE” alert every minute (chapter 22.6).
Commission per Lot — the broker’s commission in result accounting
The “Commission / 1.0 Lot RT (0=off)” cell (default 0 = off) tells the EA the estimated broker commission cost for 1.0 lot both ways (round-turn: open + close), in the account currency. Example: the broker charges 3.50 USD per side → enter 7.0. You will find the value in your broker’s account specification.
What it is for: the platform does not report commission on an open position — its current profit/loss (floating) looks better than it really is. Once you enter a value, the EA reduces the floating of every open position by lots × cost, so that Equity Guard, Basket Max Loss, Daily P/L and the Status panel see the net result and react at the true thresholds, not ones inflated by costs. Additionally:
- “Close profitable only” (and Profit Target in “close losing only” mode) will not consider profitable a position that barely covers its own commission.
- The BEa shield moves the break-even level so that “zero” also covers the basket’s commission — it closes slightly later, but at a true zero after costs (chapter 12.2).
The EA does not estimate closed trades — there it always counts the actual commission booked by the broker (including the part already charged at position open). A value of 0 = result accounting exactly as before.
The Alerts section — controlling the popup windows
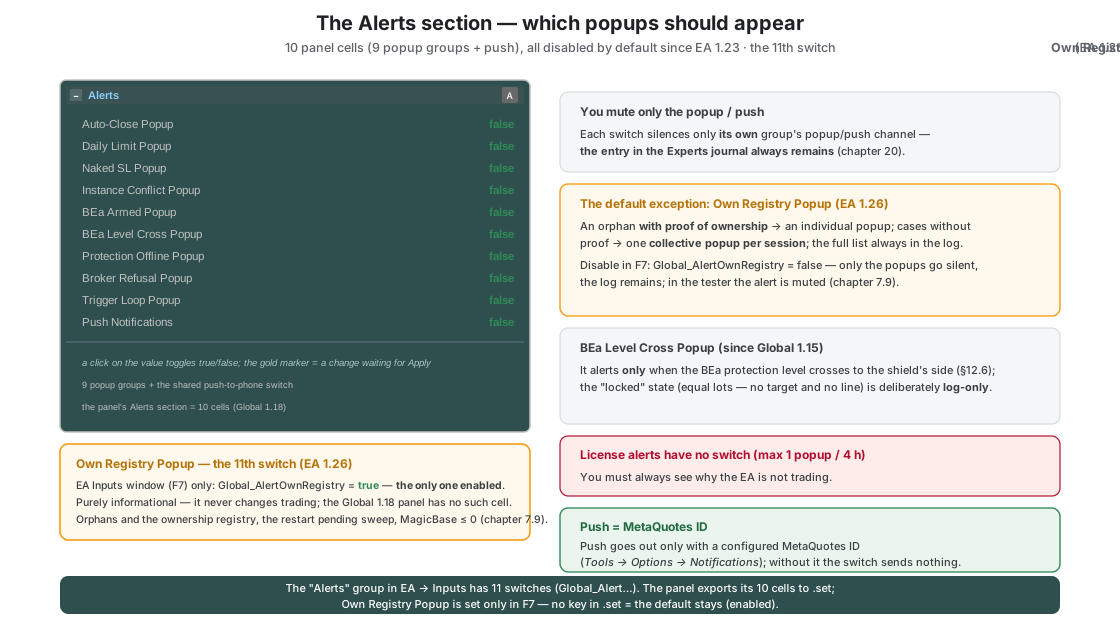
The EA reports important events with MetaTrader alert popups (Alert), and optionally also with push notifications to your phone. During intensive trading the popups can pile up — the Alerts section (since EA 1.08 / Global 1.05) lets you enable each group separately. Eleven switches (the tenth — BEa Level Cross Popup — arrived in EA 1.20 / Global 1.15; the eleventh — Own Registry Popup — in EA 1.26, and since release 2.05 (panel 2.23) it also has a cell in the panel, so the panel shows all eleven), since EA 1.23 DISABLED by default with one exception: Own Registry Popup is factory-enabled (purely informational — chapter 7.9). The remaining popups you enable consciously, only the ones you want to see (up to version 1.22 they were all enabled by default):
| Cell | When it alerts |
|---|---|
| Auto-Close Popup | a guardian automatically closed positions — the popup says which one (Equity Guard / Profit Target / Basket Max Loss / Target Line) |
| Daily Limit Popup | the daily profit or loss limit fired (Daily P/L, chapter 14) |
| Naked SL Popup | a button has virtual SL enabled but StopLoss=0 — opens are blocked, the popup explains why |
| Instance Conflict Popup | another EA instance uses the same or an overlapping Magic Number (chapter 9); since 2.05 the warning works for every chart of this terminal |
| BEa Armed Popup | after an EA restart the BEa shield is still armed (chapter 12) |
| BEa Level Cross Popup | the BEa protection level has crossed to the shield’s side — the protected basket needs the market to travel further against it to reach zero (chapter 12.6) |
| Protection Offline Popup | AutoTrading is off and protective sends are blocked — “PROTECTION OFFLINE” (chapter 22.6) |
| Broker Refusal Popup | the broker refuses an SL move or a close — including alerts about stragglers and retries |
| Trigger Loop Popup | a trigger loop between buttons was detected and the cooldown kicked in (chapter 17) |
| Own Registry Popup (EA 1.26; in the panel since 2.05) | own-registry events (chapter 7.9): an orphan with proof of ownership — an individual popup; cases without proof — one collective popup per session; pendings swept after a restart; a MagicBase ≤ 0 warning — the only switch enabled by default |
| Push Notifications | the master switch of the phone push channel (MetaQuotes ID) |
Three rules worth knowing:
- You mute only the popup / push. Each switch silences only its group’s popup/push channel — the entry in the Experts journal (log) always remains, so diagnostics never go blind (chapter 22).
- License alerts have no switch — deliberately. You must always see why the EA is not trading. To keep them bearable, the popup about the same persisting problem repeats at most once every 4 hours (chapter 3.7); the journal line is written on every attempt.
- Push requires a MetaQuotes ID configured in MT5 (Tools → Options → Notifications). Without it, an enabled switch simply sends nothing.
In prose about the tenth switch: BEa Level Cross Popup alerts only when the BEa shield’s protection level crosses to the add-on side — for a SELL basket the target ends up above the price, for a BUY basket below it, meaning the protected basket now needs the market to travel further against it. The “locked” state (equal lots — no target and no line) is deliberately log-only: with an equalizing shield it occurs on every arming, and alerting it would bury the truly dangerous case (chapter 12.6).
Which robot alert is enabled by default? Only Own Registry Popup — because it is purely informational: it reports position-ownership registry events and never changes trading, while you enable the other popups deliberately since EA 1.23. Since 2.05 you set it in the Global panel (the Alerts section, the Own Registry Popup row) or in the EA Inputs window (F7).
In prose about the eleventh switch: Own Registry Popup (Global_AlertOwnRegistry, since EA 1.26) is the only factory-enabled alert — purely informational, it never changes trading (muted in the tester). It covers the position-ownership registry events: an orphan with proof of ownership gets an individual popup, cases without proof are collected into one summary popup per session, plus the message about pendings swept after a restart and the MagicBase ≤ 0 warning. Since release 2.05 (panel 2.23) the switch has its own row in the Global panel, Own Registry Popup — in the Alerts section, below Trigger Loop Popup — so you set it in the panel or in the EA’s Inputs window (F7; there the field Popup for own-registry events (orphan positions, restart pending sweep, MagicBase<=0). ON by default: purely informational, never changes trading). A set saved from the panel carries Global_AlertOwnRegistry with the value of that row, and a fresh panel has it on (the factory value). Loading such a file via F7 sets the value from the file. Disabling it (Global_AlertOwnRegistry=false) silences only the popups — the Experts journal entries remain. Details and the anti-flood guard — chapter 7.9.
In prose about the second-instance warning: Instance Conflict Popup (in the EA’s Inputs window Popup when another instance uses the same / overlapping MagicBase) concerns a check the robot makes at start — whether another instance on the same symbol uses the same or an overlapping Magic Number base. Since 2.05 the warning works for all charts of one terminal, neighboring ones included; up to release 2.04 two charts opened one after the other were one chart for this check in 15 cases out of 16. The warning is information only: the robot changes nothing in trading, the entry in the Experts journal always appears, and the popup — only with the switch on. After moving the robot to another chart without taking it off with the Remove command, one false warning is possible, because the base reservation of the old chart stays in the terminal.
Like every Global section — you export the settings via .set (the Global_Alert… keys) and load them into the EA via F7; the same “Alerts” group is directly in the EA’s Inputs window.
The Time Setups sections — new rows (from 2.05)
The Time Setups module (chapter 19) has three sections in the panel: Time Setups (the rules of setups), Time Setups: Minute Lists (the minute lists and their sources) and Time Setups: Visuals (target switching and drawing). Since 2.05 (panels 2.23–2.27) they have new rows. Some of them are settings that up to release 2.04 you could change only in the EA’s Inputs window (F7) or in the .set file (Stop range (pts), Shared TP/SL from files and the four Server: rows); the others are robot fields new in release 2.05. Like every panel row, they go into the full .set (section 5.7).
The new rows of the Time Setups section, in panel order:
| Panel row | Factory default | What it sets |
|---|---|---|
| Stop range (pts) — below Target range (pts) | no stop (0) | the setup’s stop: the distance from the activation level in points; 0 = no stop (19.7) |
| SELL target spread (pts) | 5 | the spread allowance added to the target and the stop of a SELL setup; 0 = the spread at the moment of activation (19.7) |
| Setups waiting for entry — below Max parallel per dir | hold a place | what a setup without a position does: hold a place — it takes a place in the Max parallel per dir limit, and a minute above the limit is lost; wait in line — only a setup with a position takes a place, the others wait in the line (19.11) |
| Max waiting per dir | no limit (0) | how many setups of one direction may wait in the line; after a new minute opens, the oldest ones above the limit end; works only with wait in line (19.11) |
| Kill scope — below Kill / expiry action | all setups | which live setups the time in the Kill time (HH:MM[/days]) row ends: all of them or only those without positions (without positions) — the setups with positions then play on to their target, stop or expiry (19.10) |
| Catch-up late minute | off (0) | a listed minute in which no M1 candle formed opens on the first candle after it, at most N minutes late (19.11a) |
| End opposite same-minute | false | when the same minute stands on the BUY and the SELL list, the first position of one setup ends the opposite setup, provided that one has no position yet (19.11a) |
| Gap tolerance +/- (min) — below Min gap between setups (min) | off (0) | a ± tolerance around the gap from the Min gap between setups (min) row (19.11) |
| Skip if TP hit in last (min) | off (0) | the “TP already hit” filter: the minute is rejected when the target the setup would get was hit in the last N closed M1 candles (19.11a) |
The same in words. Stop range (pts) (in the EA’s Inputs window Stop distance from the activated level (points, 0 = no stop)) sets the setup’s stop, and SELL target spread (pts) (SELL target and stop: spread allowance added to the minute's TP and SL (points; 5 = TimeR Used Spread, 0 = the spread at the activation)) — the spread allowance added to the target and the stop of SELL setups. Setups waiting for entry (Setups waiting for entry) chooses what a setup without a position does: hold a place (in F7 Hold a place - new minutes are skipped) or wait in line (Wait in line - nearest TP enters first), and Max waiting per dir (Waiting setups per direction at most (0 = no limit, Wait in line only)) limits the number of setups waiting in the line. Kill scope (Kill scope: all live setups, or only setups without positions) chooses which setups the time in the Kill time (HH:MM[/days]) row clears. Catch-up late minute (Catch up a listed minute without an M1 candle: open it up to N minutes late (0 = off)) lets you catch up a minute in which no M1 candle formed, and End opposite same-minute (Same minute in both lists: the first position ends the opposite setup (if it has none)) ends the opposite setup of the same minute after the first position. Gap tolerance +/- (min) (Same-direction setups: +/- tolerance of the gap above - the best |C= class in the window opens, then the minute closest to the gap (0 = off, less than half the gap)) and Skip if TP hit in last (min) (Reject the minute if its target was already hit in the last N minutes (closed M1 candles, 0 = off; TimeR PRO)) are two gates a minute passes at its activation. The details of each setting — in chapter 19, in the sections given in the table.
The clear-out time with days. The Kill time (HH:MM[/days]) row (up to release 2.04 Kill time (HH:MM); in F7 Clear live setups at this time ("HH:MM" or "HH:MM/days", e.g. 23:00/12345; "" = off)) accepts, since 2.05, also a list of days after a slash, just like the minutes in the lists: 23:00/12345 is 23:00 from Monday to Friday (1 = Monday … 7 = Sunday). The panel checks the entry when you confirm the field: the minute must have two digits, and the days are digits from 1 to 7, each at most once; an empty field switches the clear-out off (the row then shows off). The panel refuses an incorrect entry — a red message TSet_KillTime rejected - see Experts log appears in the status bar, the field keeps its previous value, and the reason is in the Experts journal.
The new rows of the Time Setups: Minute Lists section, at its end:
| Panel row | Factory default | What it sets |
|---|---|---|
| Shared TP/SL from files — below Shared SELL US | true | whether a setup from the shared source (the TimeSetups folder) takes the target and the stop written next to the minute in the file; false — always the robot’s settings (19.5a) |
| Shared min class (C=) | off (0) | the minimum minute class of the shared files: 1–9 — only minutes with at least that class play, and a minute without a class does not play; 0 = the filter is off (19.5a) |
| Server: instrument from | chart symbol | where the robot takes the key of the server list from: from the chart symbol or from the row below (manual key) (19.4) |
| Server: instrument key | - (empty) | the list key agreed with the server, e.g. XAUUSD — also when your broker names the symbol differently (19.4) |
| Server: broker UTC offset | measured | where the robot gets the broker clock’s offset from UTC: it measures it at every fetch of the list or takes it from the row below (manual offset) (19.4) |
| Server: manual offset (min) | +0 min | the offset in minutes, read only with manual offset; +180 = UTC+3 (19.4) |
The same in words. The first two rows concern the shared source, that is the files from the TimeSetups folder: Shared TP/SL from files (in the EA’s Inputs window SHARED source: use the per-minute TP/SL from the files) decides whether a setup takes the target and the stop written next to the minute in the file, and Shared min class (C=) (SHARED source: minimum minute class |C= (0 = off, 1..9; when on, minutes without a class do not play)) — from which class a minute plays. The four rows starting with Server: (since panel 2.27) concern the server source: Server: instrument from (SERVER source: where the instrument key comes from) and Server: instrument key (SERVER source: instrument key (agreed name, e.g. XAUUSD - not the broker symbol)) choose the name of the list the robot asks the server for, and Server: broker UTC offset (SERVER source: how the broker's offset from UTC is obtained) and Server: manual offset (min) (SERVER source: broker offset from UTC in MINUTES (MANUAL only; +180 = UTC+3)) — how the list’s minutes are converted from UTC to the broker clock. These four rows matter only when the Times source row points to the server source (the value server; panels from before release 2.05 labelled it server (n/a)).
What else the panel refuses. The same way as a bad clear-out time entry — with a red message naming the row in the status bar, the previous value kept in the field and the reason in the Experts journal — the panel refuses what the robot would not accept at start: a Gap tolerance +/- (min) equal to half of Min gap between setups (min) or more (and the other way round: a gap that is not more than twice the tolerance) and a Shared min class (C=) above 9. Negative numbers in the number rows of these sections are turned into 0 by the panel; the exception is Server: manual offset (min), which takes the value as the robot does, negative too.
5.6 Apply (N) — the change counter and committing
OkurraGlobal — like OkurraButton — separates the draft (your current edits) from applied (the committed state, which the companion indicators read and which you export). Apply moves draft → applied.
What OkurraGlobal adds is a change counter right on the Apply button. When you have uncommitted edits, the button shows Apply (N), where N is the number of fields waiting to be committed. When everything is committed, the button simply shows Apply. This lets you see at a glance how many changes are pending in the draft — helpful with a large number of sections, where it is easy to forget that something changed somewhere.
In the vertical layout the sections additionally have “A” buttons — these are shortcuts to the same, full Apply: clicking “A” next to any section commits the entire panel (all sections at once), exactly like the main Apply. The “A” button shows no counter and does not commit selectively — it exists so that, with a long, scrolled panel, you do not have to go back to the main button.
What Apply does (the manual model, chapter 2.7):
- Draft → applied (saved to the internal state
Global_applied.ini). - A refresh of the global companion indicators on the chart.
Since 2.05 (panel 2.26) Apply in OkurraGlobal no longer saves the copy OKU/history/auto_Global_<timestamp>.ini — no program ever read it, and the folder only grew.
And just as in OkurraButton: Apply sends nothing to the EA. For the configuration to reach the robot — Save .set + F7 (section 5.7).
The R (Reset) button clears the applied global state (with a safeguard against an accidental click), without touching the history — analogous to Reset in OkurraButton.
5.7 Save / Load .set — the full setup of the entire EA
This is where OkurraGlobal differs functionally from OkurraButton and why it tends to be “the main export panel”.
Save — saving the full setup. Clicking Save in OkurraGlobal saves to a .set the complete configuration of the entire EA:
- the global section (all the settings from this panel’s 37 sections),
- plus the parameters of all five buttons (B1…B5).
This is a file ready to be loaded into the robot “as is” — everything is in it. After clicking Save a small save dialog opens with a name field — you name the file right there, in the dialog (the default Global_<timestamp>.set is suggested; confirm with “V”, cancel with “X”). The file lands in the OKU/sets/ directory; the name can also be changed later, in the Load dialog (chapter 7.2).
The version stamp in the set (from 2.05). Since panel 2.27 a set saved with the Save button carries a version stamp in the SetSchemaRev key. In release 2.05 it is 6150319 — the number of the settings schema the panel was built for. Every save gets the stamp, also when a set loaded into the panel earlier had a different stamp or none at all. This number does not depend on the robot you work with: the keys in the file are decided by the panel that saved it. Up to 2.04 a set from a fresh panel had 0 here, meaning “no stamp”, and the robot checked nothing. At start the robot compares the stamp with its own version: when the set was made before the last change to the list of parameters, or comes from a newer release than the robot, it shows a warning popup and writes it to the Experts journal — the set loads anyway.
Comparison with OkurraButton. Save in OkurraButton saves only the buttons (B1…B5), without the global section. Save in OkurraGlobal saves everything (global + buttons). If you are designing a full setup and want one file for the EA — save from OkurraGlobal. A detailed comparison of both kinds of
.set— chapter 2.4, and the full description of transferring configurations — chapter 7.
Load — loading a .set. Opens a browser of the .set files in OKU/sets/. You pick a file, the panel loads the global section from it (and — via cross-sync — passes OkurraButton its part). In the Load dialog you can also rename the saved files.
5.8 Global companion indicators
OkurraGlobal pulls in the global versions of the companion indicators — showing the global filters on the chart, i.e. the ones buttons plug into via the opt-in:
- auto-loading of the global SAR — overlays the OkurraGlobalSAR indicator (the global SAR dots).
- auto-loading of the global MMD — overlays OkurraGlobalMMD (the global MMD clouds).
- auto-loading of the global SR — overlays OkurraGlobalSR (the global SR zones).
- auto-loading of the global OKUR — overlays OkurraGlobalOscillator (the global OKUR Filter in a separate window).
- auto-loading of the global ATR — overlays OkurraGlobalATR (the volatility gate band in a separate window).
- auto-removal of the indicators — removes these overlays when you take OkurraGlobal off the chart.
Since panel 2.08 the five auto-loading switches are off by factory default, while the auto-removal switch stays active. A freshly dropped OkurraGlobal therefore adds no indicator to the chart — and takes no separate windows for OKUR and ATR. You enable the overlay you want to see in the panel settings (F7, the “Auto-load …” entries), or you drag it in from the Navigator.
The reason for that factory setting: five overlays at once mean two extra windows below the chart and a full set of objects on the price, while in design work you almost always care about one of them. Adding the one you need is cheaper than taking four you do not.
The panel removes only what it added itself. With auto-loading off, OkurraGlobal drops its ownership claim on that overlay (it records this in the Experts log), so an indicator you added by hand stays on the chart even when you take the panel off.
These indicators show the global context — regardless of which button is active in OkurraButton. Thanks to this, while designing the global filters, you immediately see on the chart where they fall and can tune them to fit the strategies that will plug into them. The full description of companion indicators (local and global) — chapter 6.
Zero state — two conditions, not one. A global overlay pulls itself in only when both are met: its “Auto-load …” entry is on in F7 (off by factory default) and you enabled “Show … On Chart” for it in the panel, confirmed with Apply. Miss either one and a fresh chart stays empty (chapter 6.6).
If “Show … On Chart” is on and nothing is on the chart, the panel writes one line into the Experts log naming the panel row and the switch that is holding it back — this is not a fault of the indicator.
A set from a panel with no saved state (from 2.05). A panel with no saved state — freshly dropped onto the chart or after the R (Reset) button — saves the robot’s factory values to the set. The exception is the deliberately switched-off visualization:
Show Global SAR On Chart,Show Global MMD On Chart,Show Global SR On Chart,Show Global OKUR On ChartandShow Global Volatility Gate (ATR) On Chart, and in the blocks of buttons that have no applied state in OkurraButton on this chart, alsoShow SAR On Chart,Show MMD On Chart,Show SR Box On ChartandShow Oscillator On Chart. The second exception is the position of the robot’s panel in the chart corner:Panel X distance from corner (px)andPanel Y distance from corner (px)are 0 in such a set. Panels up to version 2.22 still saved a few values here that differed from the robot — among them an empty name of the minute files set (with the shared source the robot then refused to start) and the Basket Max Loss mode in currency instead of percent.
5.9 Cross-sync with OkurraButton
When both panels are on the same chart, a synchronization on .set loading works between them (the mechanism described in chapter 2.5):
- You load a
.setin OkurraGlobal → OkurraGlobal loads the global section, and OkurraButton (if present) loads the B1…B5 parameters from the same file. - You load a
.setin OkurraButton → OkurraButton loads the buttons, and OkurraGlobal loads the global section.
One file load thus refreshes both panels — you do not have to load the same configuration twice. The synchronization is local to the chart and — worth repeating — does not touch the EA. For a change to reach the robot, you save the .set and load it in the EA via F7.
5.10 The typical design cycle for global settings
The working rhythm with OkurraGlobal is a twin of the OkurraButton cycle (chapter 4.12), only it concerns the frame within which the strategies operate:
- Drop OkurraGlobal onto a design chart (preferably next to OkurraButton, without the EA). The global companion indicators will not appear by themselves — a fresh panel has them switched off; switch on the ones you want to see (section 5.8, “Zero state”).
- Choose a layout — vertical or horizontal (section 5.4; a fresh panel starts in the horizontal one) — depending on how you like to work.
- Design the settings in the section families (section 5.5): first what you actually want to enable — e.g. the global filters, if the buttons are to use them, and the account guardians, if you want limits. The rest stays on sensible defaults.
- Apply. Watch the
Apply (N)counter — when it goes back toApply, everything is committed. The global companion indicators will redraw under the new configuration. - Look at the chart. Do the global filters fall where you want them to gate the buttons’ signals? Fix and commit again.
- When the whole thing is ready — click Save to save the full
.set(global + all buttons). This is the file you will load into the EA (chapter 7).
You usually design in both panels in parallel: the buttons in OkurraButton, the frame in OkurraGlobal, and at the end you save everything with a single Save from OkurraGlobal. Patience and watching the companion indicators — here, as everywhere in design mode — are the main tool.
This concludes the pair of design panels. In the next chapter we look at the companion indicators — eight visualization tools that show on the chart what the filters and oscillators see: how to read them, when to use them, how they interplay with the panels and with the EA.