
S/R zones: price reacts to levels, not to wishes
The SR Box filter builds support and resistance zones out of ZigZag swings and checks WHERE the signal fires. In reaction mode an entry is possible only at a level — fewer trades, but every one with a reason.
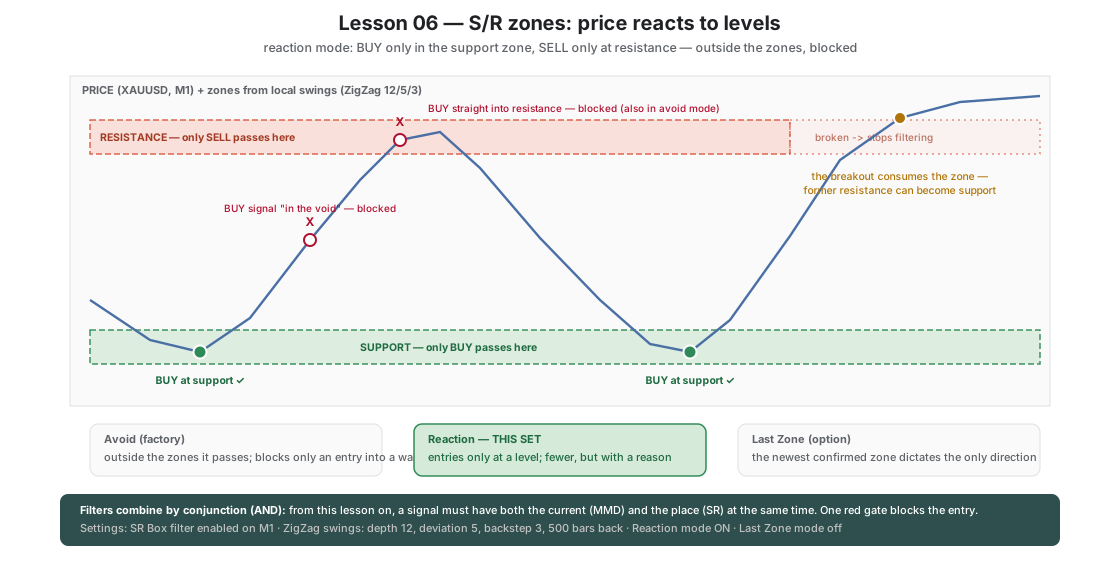
The SR Box filter builds resistance and support zones out of local highs and lows (ZigZag swings), then checks WHERE the signal fires relative to them. A zone stays active until price breaks it — once broken it stops filtering (the market has “consumed” it).
The filter has three working modes; this set deliberately uses the most instructive one:
- Avoid (factory) — “don’t walk into a wall”: outside the zones it passes everything, blocking only BUY right below resistance and SELL right on support.
- Reaction — in this set (
SR_ReactionMode=true) — “enter ONLY at a level”: the pure theory of reaction. BUY only when price stands in a support zone, SELL only at resistance. Outside the zones the filter blocks everything. - Last Zone (
SR_LastZoneMode) — the newest confirmed zone dictates the only allowed direction (resistance→SELL, support→BUY) until it is broken — you will meet it with the production set.
What is enabled and why
| Feature | Value in the set | Role |
|---|---|---|
B1_UseSRBox=true | ZigZag 12/5/3, M1, 500 candles back | building and enforcing the zones |
B1_SR_ReactionMode=true | reaction mode | entries only where there is a STRUCTURAL reason |
B1_ShowSRBox=true | zones drawn on the chart | you see the frames the filter enforces |
| MMD from lesson 05 | unchanged | AND logic: the signal must pass through BOTH filters |
Filters in Okurra combine by conjunction: one red gate blocks the entry. From this lesson the signal must have both current (MMD) and place (SR) at once.
How it makes price behavior visible
- Market memory. Zones form where price has already turned once. Watching the markers you will notice how often the reaction repeats in the same place — this is not magic, it is resting orders and the psychology of the participants.
- An entry with a reason. In reaction mode every position has a structural justification: an OKUR stretch met a zone. There are clearly fewer entries — the tighter the place condition, the more rarely the signal passes at all; loosening the settings works the other way: it raises the number of entries at the cost of their selectivity. But every entry has a level behind it to lean the trade on.
- Consuming the level. When a zone is broken it leaves the game — and often changes role (a former resistance becomes support). The filter maps this automatically: a broken frame stops blocking.
What to watch on the chart
- OKUR signals that fired “in a vacuum” (far from the zones) — in this set they disappear from the chart; judge how many of them were random.
- The confluence of three agreements: stretch + trend + zone. These are the rarest but statistically healthiest entries of the course.
- Price behavior after a zone breaks — material for understanding Last Zone mode.
One step further
Lesson 07: all decisions so far were made on M1. Time to add the verdict of a higher authority — global filters on M15. Note: from lesson 07 the SR filter returns to the gentler avoid mode — reaction mode is so selective that, multiplied by M15 consent, it would throttle entries to nearly zero (details in lesson 07).
B1_UseSRBoxB1_SR_DepthB1_SR_DeviationB1_SR_BackstepB1_SR_BarsLookBackB1_SR_TimeFrameB1_SR_ReactionModeB1_SR_LastZoneMode
Load these in MetaTrader 5 via F7 → Load to reproduce the lesson exactly. Since release 2.04 the lesson sets switch the robot on when loaded (an orange “Trading ON from .set” bar shows under the panel title); if you switched the robot off with OFF during an earlier lesson, click ON in the panel's top row — the next set does not undo your click. Available to signed-in users with an active licence.
Educational material, not investment advice. The sets are teaching examples — before any live use, test on real ticks and tune to your own account. Reference deposit 1000 in account currency, lot 0.01; scale money values proportionally to your balance.