
The BEa shield: the basket exits at even, not in panic
Break Even auto defends the whole basket: an opposite MMD cross arms the shield, the follower button adds opposite positions and drags the shared break-even level down to price.
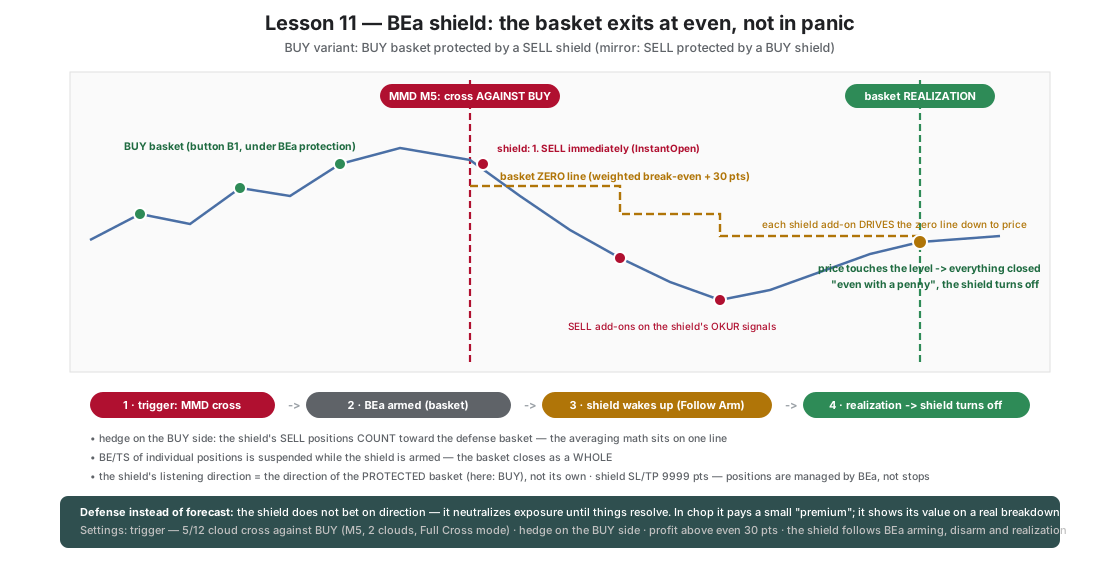
Description for the BUY variant (a BUY basket protected by a SELL shield); the SELL variant is a mirror.
Break Even auto (BEa) is a mechanism that defends the WHOLE basket of positions. Once armed, the EA computes a weighted break-even level (the price at which the basket’s total P/L = 0) and closes everything when price touches that level + BEa_Gain (30 pts). Instead of realizing a loss at the worst moment, the basket waits for an exit “to break-even (with a hair of gain)”.
Three elements work together:
- The trigger (auto-arm) —
BEa_AutoArm_byMMDCross_BUY=true: when the MMD clouds cross bearish — that is, AGAINST our BUY positions — the shield arms itself. The trigger runs on M5 in two-cloud mode (only the 5/12 cross, no Trend cloud): the defense has to react faster than the entry gates — a trigger on M15 with the full stack can be so rare that across a whole month of testing it never once hit a moment with an open basket.Full Crossmode (ArmMode=0): arming after the FULL crossing of cloud 5 to the other side of 12 (confirmed). Membership in the basket is declared byB*_BEa_Protect=true. - The shield (follower button B3) — a SELL button, normally DISABLED.
FollowBEa_Arm=true+FollowBEa_Arm_Dir=1(listening for BUY-side arms — the parameter points to the direction of the PROTECTED basket!) wake it up exactly at the moment the shield arms.BEa_InstantOpenOnArm=true— it opens the first opposite position immediately, then adds the rest on its own OKUR signals. - The hedge basket —
BEa_HedgeMode=2(BUY side): the shield’s SELL positions COUNT toward the defense basket. Each SELL add-on moves the shared zero line closer to the current price — the basket “drives” to even instead of waiting for a full market return. After realization (FollowBEa_Realized=true) the shield turns itself off.
Characteristic settings
| Key | Value | What for |
|---|---|---|
B1_BEa_Protect=true | the main basket under protection | membership in the BEa basket |
B1_ReactOnOpposite_MMD=0 | the evacuation from lesson 08 DISABLED | evacuation and the shield are COMPETING defense models for one button: M1 evacuation empties the basket before any shield trigger manages to arm (auto-arm requires open positions; verified on the tester — with evacuation the shield never armed once). You choose: you flee on the flip OR you hold the basket and defend it to even |
BEa_AutoArm_byMMDCross_BUY=true, M5, 2 clouds | trigger of the opposite 5/12 cross | the defense reacts faster than the entry gates (M15) |
BEa_AutoArm_MMD_ArmMode=0 (Full Cross) | confirmed arming | fewer false alarms (the Cloud Entry variant — lesson 12) |
B3: FollowBEa_Arm/Disarm/Realized=true, Arm_Dir=1 | the shield’s full life cycle | it wakes, works, turns off — with no human |
B3: StopLoss=9999, TakeProfit=9999 | wide technical frames | the shield’s positions are managed by BEa, not by SL/TP (note: SL=0 with virtual stops blocks the button’s trading — hence 9999) |
BEa_SuspendBETS_WhileArmed=true (factory) | BE/TS of single positions suspended | the basket closes as a WHOLE |
TH_ExcludeBEaMode=true | the shield works outside trading hours too | the defense knows no schedule |
How it makes price behavior visible
- A weighted center of gravity. The BEa level line on the chart is a live weighted average of the basket. Watch how each shield add-on drags it toward price — the geometry of averaging shown on a single line.
- Defense instead of a forecast. The shield does not bet that the drop will hold — it only neutralizes the exposure until the situation resolves. If the market turns, the BUY basket reaches even on its own and the shield realizes together with it.
- The cost of insurance. In sideways moves the shield can arm and turn off several times — at a small cost. That is the premium. You will see its value at the first real breakdown, which the basket walks to even instead of to the Basket Max Loss from lesson 09.
What to watch
- The
[BEa]arming entry + the BE level line on the chart. - The panel: the “SELL shield” button lights up on its own at the moment of arming.
- The basket realization when the zero+30 pts level is touched and the automatic turn-off of the shield.
Note: the zero-level guard since EA 1.21
Since EA 1.21 the shield has a new supervisor that is on by default: the zero-level guard (BEa_ZeroGuard_Enabled=true, explicit in this lesson’s set). It makes sure the shield’s add-ons do not tip the net basket over to their side — when the next add-on would overweight the basket, the guard does not open it, but closes the entire setup at market and disarms the shield (the zero-level guard entry in the log). For this lesson this means:
- the shield adds until it equals the protected basket’s volume (net balance = 0, exposure neutralized — landing exactly on zero passes);
- with equal lots the basket is locked: there is no target and the BEa line disappears from the chart (the
LOCKEDstate in the log); - the shield’s next signal that would overweight the basket ends the setup with a cut — instead of adding indefinitely.
On earlier EA versions (sets from before 1.21, without this key) the guard did not act, so the course of this lesson and lesson 12 under EA 1.21 differs from earlier releases. If you want the pre-1.21 behavior, set BEa_ZeroGuard_Enabled=false or raise the BEa_Adapted_Tolerance_Lots threshold (details: the Manual, chapter 12.6).
Next step
Lesson 12: all the layers of the course in one production set — plus a progression of the shield’s lots (Multisize) and the faster Cloud Entry trigger.
BEa_Gain_pointsBEa_HedgeModeBEa_ZeroGuard_EnabledBEa_AutoArm_byMMDCross_BUYBEa_AutoArm_byMMDCross_SELLBEa_AutoArm_MMD_ArmModeBEa_AutoArm_MMD_TimeFrameBEa_AutoArm_MMD_FastPeriodBEa_AutoArm_MMD_SlowPeriodBEa_AutoArm_MMD_TrendPeriodBEa_AutoArm_MMD_TwoCloudB1_BEa_ProtectB3_BEa_ProtectB3_FollowBEa_ArmB3_FollowBEa_DisarmB3_FollowBEa_RealizedB3_FollowBEa_Arm_DirBEa_InstantOpenOnArmBEa_SuspendBETS_WhileArmed
Load these in MetaTrader 5 via F7 → Load to reproduce the lesson exactly. Since release 2.04 the lesson sets switch the robot on when loaded (an orange “Trading ON from .set” bar shows under the panel title); if you switched the robot off with OFF during an earlier lesson, click ON in the panel's top row — the next set does not undo your click. Available to signed-in users with an active licence.
Educational material, not investment advice. The sets are teaching examples — before any live use, test on real ticks and tune to your own account. Reference deposit 1000 in account currency, lot 0.01; scale money values proportionally to your balance.