
Full orchestration: the skeleton of a production set
The finale of the course: three buttons in three roles and the full set of protective layers in a single set. Not “the best set for XAUUSD”, but a pattern for assembling Okurra's building blocks into a self-contained machine.
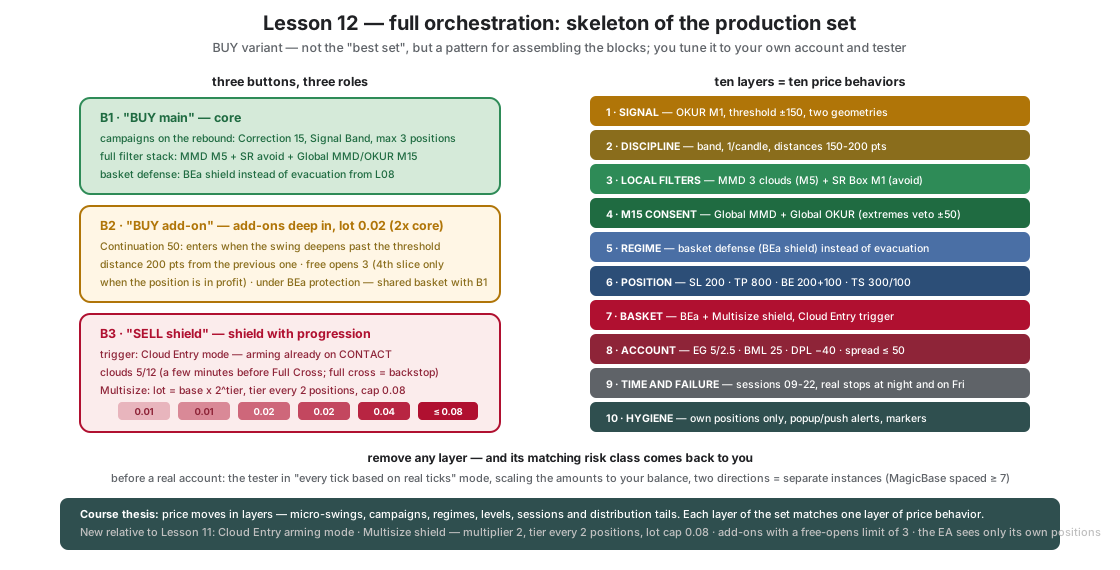
The finale of the course: three buttons in three roles plus the full set of protective layers from lessons 07–11. This is not “the best set for XAUUSD” — it is a skeleton showing how Okurra’s building blocks assemble into a complete, self-contained machine, which you then TUNE for your own account and tester.
Description for the BUY variant; the SELL variant is a mirror.
| Button | Role | Entry geometry |
|---|---|---|
| B1 “BUY main” | the core: campaigns on the rebound | Correction 15, validity window, full stack of M5+M15 filters; basket defense (the BEa shield) instead of the evacuation from lesson 08 |
| B2 “BUY add-on” | add-ons deep in the stretch, lot 0.02 | Continuation 50, distance 200 pts, FreeOpens_N=3 (add-on no. 4+ only with a position in profit); the add-on weighs 2× more than the core — position scaling: a better price gets a larger weight in the basket average |
| B3 “SELL shield” | the BEa shield with a lot progression | wakes on arming, adds with Multisize |
New compared to lesson 11:
- Cloud Entry (
BEa_AutoArm_MMD_ArmMode=1) — the shield arms already on the FIRST contact of the 5/12 clouds after a clean alignment, usually a few minutes earlier than Full Cross (the full crossing runs underneath as a backstop). Note: in a sideways market this means more arms — a deliberately defensive choice. - The shield’s Multisize —
BEa_Multisize_Mult=2,StepCount=2,MaxLot=0.08: the add-on lot = base × 2^tier, a new tier every 2 positions, with a hard cap. Each further add-on weighs more, so the basket’s zero line drives to price faster — and the cap keeps the progression from running away. - Two levels of aggression in one direction — B1 and B2 show the “main + add-on” pattern: the core enters with confirmation, the add-on improves the average deep in the move, both go into the shared defense basket (
BEa_Protect=trueon both).
The complete layer map of this set
- Signal: OKUR M1, threshold ±150, two geometries (Correction/Continuation).
- Discipline: Signal Band, 1 position/candle, distances 150/200 pts.
- Local filters: MMD 3-cloud on M5 + SR Box M1 (avoid mode).
- Higher-frame M15 consent: Global MMD + Global OKUR (extremes veto ±50).
- Regime reaction: the basket model — instead of the evacuation from lesson 08, the basket stays on the market and the BEa shield defends it (both models are competing: evacuation empties the basket before the shield arms — pick one per button).
- Position management: SL 200 / TP 800 / BE 200+100 / TS 300÷100.
- Basket defense: BEa + the multisize shield, Cloud Entry M15 trigger.
- Account defense: EG 5/2.5 trailing, BML 25, DPL −40 day, spread ≤50.
- Time and failure: sessions 09–22, real stops overnight and before the weekend.
- Hygiene:
Global_MonitorOwnOnly=true(factory — the EA sees only its own positions), popup/push alerts enabled, trade markers on the chart.
How it makes price behavior visible
This set is the thesis of the whole course spoken in a single file: price moves in layers — micro-stretches (the signal), campaigns (the band), regimes (the M1/M15 clouds), levels (the zones), sessions (the clock) and the tails of the distribution (the breakdowns the shield and the fuses wait for). Each layer of the set corresponds to one layer of price behavior. Remove any of them — and the class of risk it answers comes back to you.
Before you run it on a live account: put BOTH variants through the strategy tester (in the every tick based on real ticks mode — OHLC models overstate the results of intrabar mechanisms), scale the monetary values to your balance, and decide whether you play one direction or both at once (two mirrored sets = separate instances with a MagicBase spacing of ≥ 7).
What to watch
- The cooperation of B1/B2: the main enters first, the add-on improves the average deeper.
- The shield’s lot tiers on a longer defense (0.01 → 0.02 → 0.04, cap 0.08).
- The difference in the arming moment of Cloud Entry vs Full Cross from lesson 11.
- Which fuse speaks up first in a bad week — EG, BML or DPL.
Note: the zero-level guard since EA 1.21
This lesson inherits the change described in lesson 11: since EA 1.21 the zero-level guard is on by default (BEa_ZeroGuard_Enabled=true, explicit in the set). With the Multisize progression you will feel it sooner than in lesson 11 — the growing lot tiers of the shield (0.02 → 0.04) attempt to overweight the basket earlier, and an overweight attempt closes the entire setup instead of opening the add-on. Details and how to return to the old behavior — the note in lesson 11 and the Manual, chapter 12.6.
Next step
You have 24 files and 12 layers. The right order of study: load the set of lesson N, watch it on the chart/tester until you understand EVERY trade, and only then move to N+1. Okurra is not a black box — it is a language for describing price behavior, and this course is its primer.
BEa_Multisize_MultBEa_Multisize_StepCountBEa_Multisize_MaxLotBEa_ZeroGuard_EnabledBEa_AutoArm_MMD_ArmModeB2_Movement_ContinuationB2_FreeOpens_NGlobal_MonitorOwnOnlyGlobal_AlertOnAutoCloseGlobal_AlertDailyLimitGlobal_AlertNakedSLGlobal_AlertInstanceConflictGlobal_AlertBEaArmedRestartGlobal_AlertProtectionOfflineGlobal_AlertBrokerRefusalGlobal_AlertTriggerLoopGlobal_AlertPush
Load these in MetaTrader 5 via F7 → Load to reproduce the lesson exactly. Since release 2.04 the lesson sets switch the robot on when loaded (an orange “Trading ON from .set” bar shows under the panel title); if you switched the robot off with OFF during an earlier lesson, click ON in the panel's top row — the next set does not undo your click. Available to signed-in users with an active licence.
Educational material, not investment advice. The sets are teaching examples — before any live use, test on real ticks and tune to your own account. Reference deposit 1000 in account currency, lot 0.01; scale money values proportionally to your balance.