
Regime change: evacuation on the opposite signal
Filters guard the entry — but what about positions that already live when the market flips regime? The React on Opposite mechanism closes them by a structural decision, not a price stop.
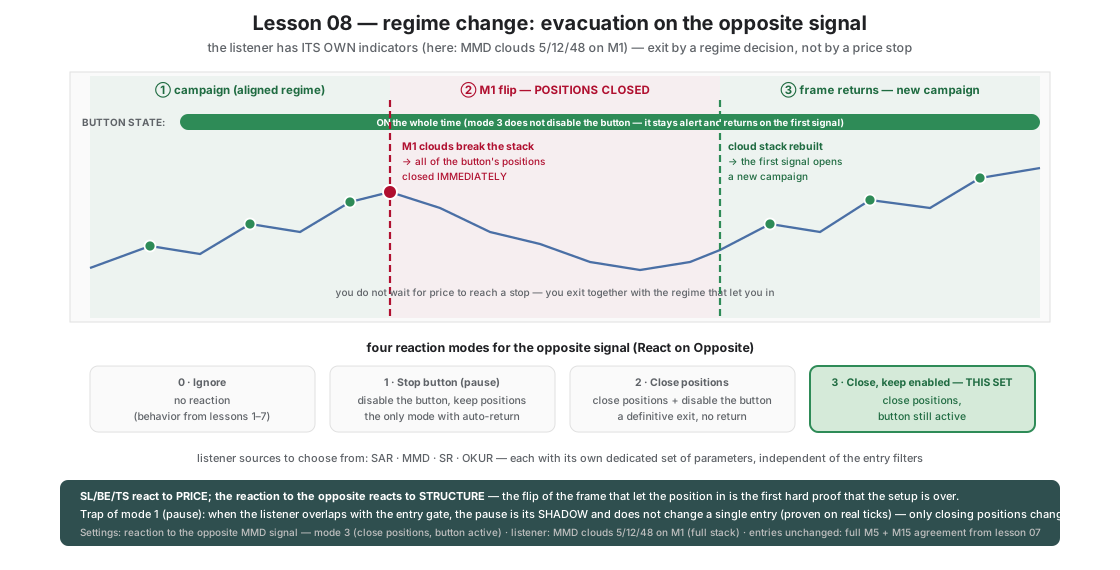
The filters from lessons 05–07 guard the entry. But what about POSITIONS that already live when the market flips regime? That is the job of the React on Opposite (Stop on Opposite) mechanism — listening for the opposite signal from a dedicated set of indicators (independent of the entry filters). Four possible reactions:
| Mode | Action |
|---|---|
| 0 — Ignore | no reaction (the behavior so far) |
| 1 — Stop button | disable the button, leave the positions (BE/TS keeps managing them); the only mode with auto-return |
| 2 — Close positions | close the button’s positions and disable it (a definitive exit — no auto-return) |
| 3 — Close, keep enabled — THIS SET | close the positions, the button stays active — evacuation on the flip, ready to play when the regime returns |
This set uses mode 3 on the MMD M1 source (the full stack of 3 clouds): the moment the one-minute clouds turn against the button’s direction, its positions and pending orders are closed IMMEDIATELY — instead of living out their BE/TS in a deteriorating regime. The button stays active and returns to play on the first signal after the frame comes back.
The sensitivity of the listener is a slider between “asleep” and “overeager” — checked on real ticks (the BUY variant): listening on M5 or higher barely wakes up (positions die on BE/TS before the slow clouds manage to turn — almost nothing changes); M1 with the full stack — this set — evacuates a clear portion of the activity; M1 in two-cloud mode already cuts the decisive majority of entries. Choosing the sensitivity is your decision about how early you trust the shadow of a reversal.
What is enabled and why
| Feature | Value in the set | Role |
|---|---|---|
B1_ReactOnOpposite_MMD=3 | close positions, button active | an exit by a regime decision, not a price stop |
StopOpp_MMD_TimeFrame=M1 | listening on M1, full cloud stack 5/12/48 | the fastest FULL evidence of reversal: three one-minute clouds turned against the position |
| The whole stack from lesson 07 | unchanged | entries still require full M5 + M15 consent |
Note the separation of duties: the entry filters (B1_Use*) and the reversal listener (StopOpp_*) have SEPARATE parameters — you can enter by one frame and evacuate by another.
A trap worth understanding (verified on the tester)
Mode 1 (pause) with auto-return looks tempting: “don’t panic, just stop adding”. But it has a non-obvious property: if the listener overlaps with ANY entry gate (the same indicator and timeframe), it does not change a single entry — when the listener is opposite, the gate blocks anyway, and auto-return restores the button exactly when the gate passes again. A pause is a shadow of the gate. We checked this on real ticks: listening on M5, M15 and H1 in mode 1 gave a result identical to the cent with lesson 07. Mode 1 makes sense when the listener watches something the gates do not see (a different indicator, a different frame) — and it is the position-closing mode that actually makes the difference in the RESULT.
How it makes price behavior visible
- Regimes have edges. On the chart you will see the points where the M1 clouds break the stack — and immediate close markers: the positions do not wait for price to reach a stop, they leave together with the regime that let them in.
- Price stop vs regime stop. SL/BE/TS react to PRICE; the reaction to the opposite reacts to STRUCTURE. Compare on the markers: some evacuations save a profit the trailing would not have defended; some flee just before a bottom that would have held. This is the cost and the value of structural decisions.
- Readiness instead of sulking at the market. Mode 3 does not disable the button — after the frame returns, the first signal opens a new campaign. The rhythm close → silence → new campaign is visible to the naked eye.
What to watch
- The
[React on Opposite] ... CLOSE_KEEP_ENABLEDentries in the log — each evacuation with the number of closed positions. - Markers: closes halfway between the entry and the SL/TP — the signature of a regime exit.
- Comparison with lesson 07 (the same period): the difference comes from trades cut earlier by the M1 flip.
Next step
Lesson 09: everything above defends the POSITION. Time for a layer that defends the ACCOUNT: Equity Guard, Basket Max Loss and a daily fuse.
B1_ReactOnOpposite_MMDB1_ReactOnOpposite_SARB1_ReactOnOpposite_SRB1_ReactOnOpposite_OKURB1_AutoReArmOnOppositeBackStopOpp_MMD_TimeFrame
Load these in MetaTrader 5 via F7 → Load to reproduce the lesson exactly. Since release 2.04 the lesson sets switch the robot on when loaded (an orange “Trading ON from .set” bar shows under the panel title); if you switched the robot off with OFF during an earlier lesson, click ON in the panel's top row — the next set does not undo your click. Available to signed-in users with an active licence.
Educational material, not investment advice. The sets are teaching examples — before any live use, test on real ticks and tune to your own account. Reference deposit 1000 in account currency, lot 0.01; scale money values proportionally to your balance.